 As requested, a tutorial on the crepe paper peonies . I did do things a little different than Martha explains in her book....sometimes, the books don't always do all the explaining, so here is what I did.
If you have the Encyclopedia of Crafts, this project is on page 248. I liked the peony, but there are several flowers to chose from to make.
List of Supplies:
Crepe Paper
Floral Tape
Floral Wire
Scissors
Pom-Pom

First, create the stamen using the pom-pom and heavy gauge floral wire. Wrap a square of crepe paper around the pom-pom and secure with floral tape. Set aside.
 Next, I cut 35 squares of crepe paper and cut into petal shape. I just eye-balled it, I didn't use a pattern as shown in the book. I cut five at a time, that sped up the process a lot. Start attaching the petals around the stamen using floral tape
I did two, sometimes three petals at a time, again to speed up the process.
If you've never used floral tape, it can be a little tricky. You just can't use it like normal tape, it won't work. It doesn't become tacky without pulling and stretching it. Don't pull too hard, it will break, but pull and stretch a little and capture the petals under it.

Keep building up the petals until you've used them all up.

This is what it should look like with all the petals attached and the floral tape properly used. It should be very tight and secure.

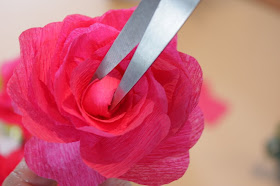
This step is not in the book, I didn't like how big the stamen looked, so I cut out the pom-pom. Use scissors to clip down the center and remove the pom-pom.

After the pom-pom is removed:

I did one without the pom-pom removal technique and I didn't like it, so all of the others I removed the pom-pom.
 Carefully fluff out the petals, the crepe paper is great for doing that, and you've created yourself a beautiful crepe paper peony.
 Have fun, I hope you give it a try!
Thanks for stopping by.


I love how you cut out the pom pom -- you got a nice curved shape in the center, with out all the bulk!
ReplyDelete~Amanda
Oh my goodness! Just beautiful, I love it. Great photos.
ReplyDeleteThese are just lovely!
ReplyDeleteholy moly, this is gorgeous! love those petals, so REAL looking!
ReplyDeleteBeautiful! I made some crepe paper roses today for the first time as a topiary- you should come see! I am going to have to try to make these peonies- they are so pretty!
ReplyDeleteThese are so pretty!
ReplyDeleteI'm so glad that you posted this. My little sis is getting married something this spring/summer and I can see us using these to make the budget for the reception decor go a LOT further.
Those are beautiful! Thanks for sharing a great idea to add pops of spring to our homes!
ReplyDeleteI love your blog and awarded you the "Stylish Blogger Award" Come on over and check it out!
Love the Roses and of course Love Your Blog. I am one of your followers and look forward to your blogs.
ReplyDeleteCarol
freshlinenscottonandlace.blogspot.com
That looks so real! Nice job!
ReplyDeleteNow this is one craft that I have never done, thanks for the tutorial! It's the perfect answer for our $0 budget cheerleading banquet. Thanks, Michelle!
ReplyDelete