Categories

Monday, February 28, 2011

Inspiration Monday: Camilla Molders

I always love when fellow bloggers share a source for great design, that is exactly how I found out about Camilla Molders (love her name!). Thanks to Kirsten, I caught a glimpse of one of Camilla's rooms and off I went to explore.


Based in Australia, I was of course instantly drawn to her use of color, not to mention some of my favorite colors. I love the artwork above the sofa, it looks like a aerial view of some coastline, neat.
The beautiful green ottoman and over sized tray, you know me and my trays, I love them. I also like the use of neutral backgrounds and color used in the way of accessories, just how I like it.


I think I am drawn to this particular picture because I will be reupholstering Keegan's chair soon and one of the fabric samples is a chocolate chenille. I'll be showing you those soon, I'm waiting for a few more swatches to arrive in the mail.


This is my favorite. I love everything about this room, the pillows are divine and I love the palm fronds. Black. White. Green. Love.


Very nice Camilla, I like your style!


Check out her website here and her blog here.


Monday, February 21, 2011

A Couple of Announcements

(Random picture, I just can't have a pictureless post! :)
Happy Monday everyone! I hope everyone had a great weekend. I wanted to make a couple of announcements about what is going to be happening here on the blog. Nothing drastic, I just want to introduce a more organized schedule.....and when I say schedule, I mean more along the lines of having a better idea of what you'll see here at Sweet Something Design. Up until now, I'm kinda squirrely on what I write about, but I am trying to get more organized, you know, that whole New Year's Goal thing. So after some careful planning, here is what I've come up with and I hope you'll enjoy:


Inspiration Monday

With so much inspiration around the web, Monday's are going to be devoted to sharing interesting and inspiring links, with pictures of course.


It Works For Me Tuesday

From fabrics, to paint colors, to DIY projects and anything in between....if it works for me, it might work for you! I'm looking forward to sharing what I love and relate to, I know we'll find something in common.


Whatever Wednesday

Wednesday's are open to share whatever I'm working on. Let's face it, I am squirrely, so I need an open day, Lord only knows what I'll share, I need a little wiggle room on Wednesday, maybe I should name it Wiggle Wednesday! :)


At Home Thursday

Take a look at what I'm piddling on here at home. Projects, tablescapes, mantelscapes, seasonal interest, and more. How about some field trips too!


Weekend Links

For now, Fridays are the day I want to share links to peruse over the weekend. Eventually, I will use Fridays to highlight my sponsors.


Secondly, I would like to start accepting sponsors. The online community is such an inspiring force, I would love to highlight your blog, Etsy shop (or any other store), or website. This has been on my mind (and heart) for a long time now. Any chance to partner with a fellow entrepreneur is truly one of my goals. My sidebar is open and ready to welcome you! The only disclaimer I have is that each sponsor will be researched before being accepted. This is not to offend anyone, simply stated, I must feel that my readers will benefit from your product or service and I want to make sure we are a good fit. I look at sponsorship more as a partnership and I would love to work with you! If you are interested in becoming a sponsor, email me for rates.


I am excited to share these new things with you! Thank you so much for stopping by and while you are here, consider following along!

I will be starting the new schedule next week and the sponsorship right away, email me.


Friday, February 18, 2011

Winter Retreat


Justin and I were able to get away for Valentine's Day weekend, not specifically for the day, mind you, you know how I feel about Valentine's Day, but we were able to get away and it was wonderful. For me, I think that just getting out from underneath the snow we've been having and getting out in nature (instant cure for cabin fever). The weather was absolutely beautiful and we really enjoyed slowing down a bit. Thanks to the in-laws for watching the kiddies.


Being from the coast of North Carolina, I am an ocean girl all the way, but living in Missouri for the past several years, you can't help but come to appreciate the lakes in this area. Table Rock Lake, Lake Taneycomo, and Bull Shoals Lake are all near Branson. I don't really get into the tourist attractions and shows on the strip, commonly associated with Branson, but Branson has a lot more to offer than you might think. Of course we are in the dead of winter, but Table Rock Lake is such a peaceful place to be, regardless.


This is the view from the hotel window, you can still see a little remaining snow in the view over the lake. The weekend (and this week) has had such warm temps, the snow didn't have a chance!


We drove down to the lake, parked and started walking. We enjoyed walking on the shore, very rocky, a little bit like hiking, but wonderful.


No sand in our toes that's for sure!!


A lone fisherman was the only other person we saw. That is the biggest adjustment I think that I have had to make, seeing lakes carved out of the landscape, I'm just so use to the eastern seaboard, crashing waves and coastline, completely opposite of lakes.


Lichen and sheet mosses, fallen leaves, wooded areas just steps away from the shore.


As we walked and walked, I began to notice the driftwood that was every where, fallen limbs and branches that was bleached by the sun, smooth and barkless. Of course, then I started thinking what I could do with all the driftwood, so I picked up every piece I found.


I brought a good collection home and used two big cylinder vases to display all the driftwood. It looks like driftwood bouquets! I can't wait until we get closer to Summer, I'm thinking of using the bouquets on the mantle, add some shells and sand and it will represent life in NC and my other life here in MO. I'm pretty sure I would not have been able to find so much if it had not been winter. I also thought about making one of those driftwood mirrors, how fun would that be, to have collected all the wood yourself?


So while I am a coastal girl at heart and will never give up my ocean, lakes are coming in as close second favorite. It is fun accessorizing with nature's gifts!


So, here's my question: Are you a lake or ocean person?


Tuesday, February 15, 2011

Spring Mantle 2011

I've been piddling in the living room, poor thing, it's been neglected since I've been doing the kitchen facelift. The mantle has been completely bare, so I've done a pre-spring mantle to get myself in the mood for what's going to happen after all this snow melts! At this time of year, all the Christmas is gone, but it's not Springtime yet, so I present the pre-spring mantlescape.

This is my first spring mantlescape since the fireplace facelift, if you'd like to see the transformation the fireplace underwent, click here.

I kept the mantlescape devoid of too much color, and I'm enjoying the simplicity of it right now. With the green/white/grey kick I found myself on in the kitchen, I just carried it into the living room. But I know myself, the warmer it gets, the more color I'll crave. That will just be another excuse to change up the mantle again. :)

Of course the craft and hobby stores have had spring flowers out for a while now, I found some little twiggy blossoms and a lilac looking flower in green. Pretty simple for right now, I added in some curly willow and called it done. You're done.

The flowers are the only thing I purchased, everything else I shopped the house for. The white vases I've had, the candleholders and my funky circle sculpture thingies....


I typically use candles in the non-working fireplace, but since I used a collection of votives on the mantle plus two big candles, I decided to put my grapevine spheres in instead. I found those at Target 2 or 3 years ago.


I love having the big round 40" mirror above the mantle, but for a change I've been considering doing a large canvas instead, maybe something for this summer. Surely, I can pull off some colorful abstract art! :)
We'll see how it goes...


For now though, it's green, cream and serene (and clean, yay! :).


Thank you so much for stopping by! I hope you are inspired to do a pre-spring mantlescape at your house!


If you would like to view the bazillion photos I've taken of this mantlescape, click here to see my photostream!


Thursday, February 10, 2011

When Bad Hotel Art Goes Good

This story begins a couple of years ago, while shopping in Kansas City. I stopped by the Curious Sofa, and found a great unframed botanical poster and brought it home with me. I recently read on Debbie's blog, that she has closed the doors of the Curious Sofa after 10 years, I'm sure it will be missed, I never got there enough.
I had the poster rolled up in my closet, all but forgotten, until last week when I was strolling through my favorite thrift store, and spotted some bad hotel art, the poster instantly sprang to mind. With all the snow and ice Missouri has been experiencing the last two weeks, I haven't been out much....but of course the first break in the weather, I make a beeline for the thrift store. Forget food and supplies.
Bad hotel art yes, but it was a fantastic size, great frame, matting and glass, a perfect candidate for a make-over. The tell-tell signs of being screwed to the wall of some hotel, yet left me questioning why anyone would want to steal this....and yes that is a mauve frame. Bleck.

...and the low, low price of $3.98, nice.


I felt super lucky that the matting was a perfect compliment to the poster, and while the poster didn't fit perfectly, it looked even better imperfect.
A great collected look( and it really is). I cleaned the glass and painted the frame black, I filled the screw holes in with wood fill, good as new. I had to paint the frame by hand because it is just too cold to spray paint, I used some black craft paint and a sponge brush.


After the frame dried, I reassembled everything. I couldn't be happier with how it turned out and my poster finally found a home, and on a budget.


I needed a big piece to serve as an anchor on the wall above my bookcases, and I think the bad hotel art did it! :)
I love mixing vintage and mod together...a printer's tray and an old wheel cog paired with modernized (with spray paint) ginger jars. All thrift store/antique store finds. The black urn is something I recently found at Hobby Lobby and added a little faux maiden hair fern. So for the duration of winter, or until I get bored, which ever comes first, I love how it looks up there.


Thanks so much for stopping by! I hope you are inspired to reinvent bad hotel art!


linkparty


Wednesday, February 9, 2011

Crepe Paper Flowers


As requested, a tutorial on the crepe paper peonies . I did do things a little different than Martha explains in her book....sometimes, the books don't always do all the explaining, so here is what I did.

If you have the Encyclopedia of Crafts, this project is on page 248. I liked the peony, but there are several flowers to chose from to make.


List of Supplies:


Crepe Paper

Floral Tape

Floral Wire

Scissors

Pom-Pom


First, create the stamen using the pom-pom and heavy gauge floral wire. Wrap a square of crepe paper around the pom-pom and secure with floral tape. Set aside.


Next, I cut 35 squares of crepe paper and cut into petal shape. I just eye-balled it, I didn't use a pattern as shown in the book. I cut five at a time, that sped up the process a lot. Start attaching the petals around the stamen using floral tape


I did two, sometimes three petals at a time, again to speed up the process.


If you've never used floral tape, it can be a little tricky. You just can't use it like normal tape, it won't work. It doesn't become tacky without pulling and stretching it. Don't pull too hard, it will break, but pull and stretch a little and capture the petals under it.


Keep building up the petals until you've used them all up.


This is what it should look like with all the petals attached and the floral tape properly used. It should be very tight and secure.


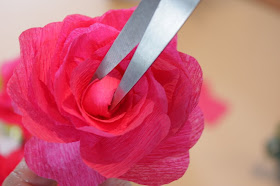
This step is not in the book, I didn't like how big the stamen looked, so I cut out the pom-pom. Use scissors to clip down the center and remove the pom-pom.


After the pom-pom is removed:

I did one without the pom-pom removal technique and I didn't like it, so all of the others I removed the pom-pom.

Carefully fluff out the petals, the crepe paper is great for doing that, and you've created yourself a beautiful crepe paper peony.

Have fun, I hope you give it a try!
Thanks for stopping by.

giveaways