Categories

Thursday, March 31, 2011

DIY Printer's Block Art

(Have you met my favorite vintage owl plate? :)


While this concept is nothing new, I love the idea of creating printer block art for yourself using the letters that you've collected over time, it has so much more meaning I think. I finally got enough letters in my collection to create my own piece of art. Happy, happy, joy, joy.

What you'll need for this project:


Deep frame or shadow box frame


Matting without any openings


Vintage printer block letters


Glue gun


Depending on how large your block letter collection is will determine what size frame you'll need. I used 19 letters and my frame is 20 inches square. I would like to do some smaller ones too, after I do some more collecting.
I went to Hobby Lobby's framing department and had them cut some matting for me without any openings. They do charge for the cuts but luckily the matting itself was on sale, so it wasn't too bad. I used matting because it's nice and firm, anything else would be too flimsy. I think another neat idea would be to use fabric or burlap on the matting if you are not into the modern look. Next, begin working on the composition of the letters, this is not an exact science, just use your eye to get the composition right. I have a combination of big and small wooden blocks and a couple of metal ones, so yours will depend on what you've got. I did some upside down and sideways to keep it interesting. I recommend occasionally laying the frame down on what you've done to make sure it's looking right within the frame. I have had this frame for years and it just so happened to be deep enough to accommodate the letters, but shadow box frames will work too. Once the composition is perfect, begin to glue each letter down on the matting, carefully picking them up and quickly laying them back down making sure nothing shifts. Carefully put the frame back together and it is ready to hang! It ended up being kinda heavy! I hung my new/old piece of art among thrifted plates and photographs....using the vintage letters and the modern frame is like music to me! Here's a bonus project; I found a scalloped plate while thrifting, sprayed it flat black and glued a craft mirror in the center, I love it and super simple! I love how it turned out and is quite the focal point. I am still working on a post specifically focused on creating a gallery wall, so be sure to look for that soon. Thank you for stopping by, I hope you're inspired to create some art!


Chic on a Shoestring Decorating


Wednesday, March 30, 2011

Field Trip: Antique Row of St. Louis

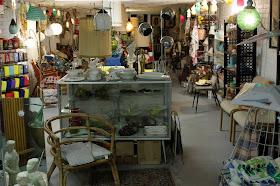
Have you been to Cherokee Antique Row? While shopping in St Louis this past weekend, my MIL and I stumbled upon 6 blocks of shop after shop of antique shops, diners, cafes and vintage clothing stores. A second hand lovers (such as myself) dream street.

We parked the car and just walked (really fast, it was snowing and freezing cold!) to each store that held the promise of my next "find".


This was probably the best antique shop I've been in of late. Some really amazing pieces of furniture....consoles, buffets, tables, chairs, china hutches...whoever the buyer is has a great eye and style. While most of it was not in my taste, I can still see the value of everything selected for the shop and I was really left wondering where was it all found! It makes it easy though to have it all in one location and if you were searching for a particular piece, I bet you would find it here. I fell in love with a blown glass chandy and a pair of chairs, neither of which came home with me, maybe next time. ;)

I was also in heaven when we entered A Light Above, a spectacular collection of stunning chandeliers from every era imaginable. Any style, finish and size could be found here, oh and sconces and mirrors too, all vintage, all divine.

China Find, a source for dishaholics everywhere. Sets of dinnerware galore from the 1940's through today...Lenox, Noritake, you name it, they had it. I loved this vintage green glass.

The Purple Cow, yes you read it right, that's the name of this next store, I loved this mid-century beauty:I love this iconic chair too, I was totally channeling my inner Kelly Wearstler!
This vintage boutique specialized in mid-century, it was probably my favorite, with all the retro goods.


We had fun on Antique Row, so next time you are in St. Louis, be sure to check it out!


Tomorrow, I will be showing you some easy DIY Artwork, you are gonna love it!


Tuesday, March 29, 2011

New Suzani Curtain Panels and Other Stuff

Last week you might have read that I was on the hunt for new curtain panels because my boring beige curtains were just not cutting it anymore. So on this past weekends excursion to St. Louis, it afforded me a trip to World Market (how I wish one was closer to me). Lo and behold, I actually found some affordable panels! Have you been to this store before? It's a cross between Pier 1 and a specialty food store. It's got rugs, pillows, dinnerware....all kinds of stuff and quite affordable.


Before (boring beige curtain panel)


I typically keep things fairly neutral and solid colors, IE boring. I like to play with pattern with throw pillows, and I still do, but this is the first time I've gone bold on the windows. You should have seen me in the store, hem-hawing over the decision. Thank goodness my MIL has a lot of patience. :)

These curtain panels have several things going for them. First, clearly, color. It has my turquoise, my orange, and a nice neutral background. In addition, I also have a yellow and persimmon color to play with too. Then there is the pattern. I have been enamored with Suzani for a while and have shopped for pillows and fabrics, so that was also an easy deciding factor. Also, they are lined and came with a nice tie-back if I ever want to do that, I thought that was a nice bonus. Oh, and they came in 96" which is exactly what I needed, I was so happy, usually that's a 'special order' to get that length.


After (Colorful Suzani curtain panel)


I also found a great wooden lantern at Home Goods. I have been looking at lanterns for some time, and this was a great looking one with a great price. I put three candles and some moss in for now, but I see doing lots of things with this baby!

Here is a quick and easy DIY project that you can do in 15 minutes or less....buy those unfinished wooden letters at the craft store, paint it out whatever color and glue to a salvaged piece of wood. This 'K' (for Keegan) just so happened to fit perfectly on a scrap block I had. Easy peasy, fun gift idea too. I love the super shiny against the old wood.


Here is a close up of the curtain, I haven't ironed them yet. ;) I was so excited I threw them right up on the rods!


I am really happy about how they are looking. Now I think I am going to buy a thicker rod and probably some rings to make them look a little more custom. I am considering a trim too, but I am not really a tassel kind of gal, so we'll see what I can find. Maybe something in jute, that would be nice! New pillow alert, I have a pillow sickness, really I do. This coordinated with the curtains so well that I just couldn't leave it. Beautiful colors in this Ikat-ish design. If you notice some new artwork on my gallery wall, I'll be showing you how I made it on Thursday. It's one of my easiest DIY projects yet!
There's nothing like a couple of shopping trips to change a whole room! Please don't mind the night time pictures, you wouldn't have been able to see the curtains as well otherwise so the pictures are a little more dull than I like.


Thank you for stopping by, I hope you are inspired to go bold on your windows!! I was a little all over the board here, I've told you before how squirrely I am! See you tomorrow with a field trip around St. Louis! Joining Kristin

Thursday, March 24, 2011

Weekend Inspiration: Mantlescape

Even though we have a non-working fireplace, it is the natural focal point in the living room, and it just can't be ignored. Creating a mantlescape is a wonderful way to incorporate your room's overall design story, it's one of my most favorite things to do. The fireplace is the very first thing that you see when you walk into our home, and since the Fireplace Facelift, I have a lot of fun changing it up often. But you know that about me already right? :)


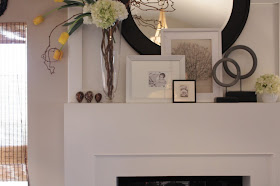
I typically like asymmetric displays, (although I've done symmetry before) in part because of the vaulted ceilings, it's not a large room, just high ceilings. I like using tall and large scaled vases or candle holders to begin and fill in with smaller items around it (or them). I let a little Summer sneak into this mantlescape, though the tulips leave it decidedly spring.


The round mirror acts as my usual backdrop, and I layer frames in front, just leaning them. I keep thinking that I want to put up a different mirror or abstract canvas up there instead, but I like the black and white contrast. Considering the sheer size of it (40") and the ridiculous weight has nothing to do with it. ;) Someone asked me where I found the mirror at and I didn't get around to answering, but I found it at Hobby Lobby. My funky circle sculptures made the cut from the Pre-Spring mantle and a milk glass vase with hydrangeas complete the display. The pleather ottoman in front of the fireplace offers some extra seating (it's usually at the foot of my bed) and a small tray display that is easily moved to the coffee table when needed. See my new throw I found at Ikea? It was some crazy low price like 12.99 or something. I did an arrangement of tulips and hydrangeas and kiwi vine, very contemporary, but I like how it adds some real visual interest and structure up there.
A little turtle magnifying glass on top of vintage postcards and a little carved rosewood box, I found a whole bunch of black and white and sepia postcards at an antique shop here in town. I really love them, somebody collected them with care and I will continue it! I want to frame up a few too. You've seen my framed sea fan before, still one of the best GW finds ever, and a framed snapshot of Keegan when he was about 3 weeks old (I love that shot). A little B&W flower picture too. I am on the hunt for some inexpensive drapery panels (if those exist), I think the ones I have are a little too boring. Thank you for stopping by and I hope you are inspired to create an asymentrical mantlescape! I'll be out of town until next week, in case you missed that, a little Spring Break getaway!


Joining Kate