Categories

Friday, December 28, 2012

Goodbye For A While

 I hope everyone had a beautiful Christmas, that you were surrounded by people you love. Back in the beginning of December when I said I would not be around much, I guess I wasn't kidding...it's been a while since I've sat down and written anything....it's surprising to me how easy it is not to be thinking of this part of my life for so long. It began as a feeling I was having to make the season less stressful....I decorated less, crafted less....and that felt ok...but between you and me, I miss the old me that was unstoppable.
 Then the tragedy in Newtown occurred and my heart has been burdened, it felt ridiculous to blog more than ever. I know that we must move forward, that we have to get back up again after being stunned and damaged....I have had to learn to do that dealing with cancer, it is not easy to do....but we must.
 I feel sort of foolish blogging to say I won't be blogging for a while, but I just don't want to stop and not let you guys know. I'm not giving up, I'm just taking a break. I am going to take as much time as needed to try to sort out a few things and of course continue to try to stay strong going through my treatments...it's hard to believe that I have been on chemo for almost a year now.....and really nothing to show for it but hair loss and medical bills. I have a CT scan the first part of January and maybe this new regimen is doing something??? We'll see.
I also don't want to go without saying thank you to all of you that have supported me through all of this. My cheering squad, my prayer warriors...please know how grateful I am that you take the time to whisper my name in prayer and comment here or take the time to email me. Countless times I am amazed at the comradeship we all have, but I shouldn't be, you guys are incredible. Thank you from the bottom, top and middle of my heart. 
I hope you all have a wonderful New Year! If you want to contact me, feel free to email me at sweetsomethingdesign@yahoo.com and even look me up on facebook.

"What we call the beginning is often the end. And to make an end is to make a beginning. The end is where we start from." T.S. Eliot

2011-12-013

Thursday, December 13, 2012

Christmas Tree 2012


It is officially Christmastime at the Edwards house, the tree is done! This year, if you read THIS post, you know I'm trying to take a stress-less approach to the Holiday season. So with the whole decorating thing, I took my time.....but I've gotten the glitter vacuumed up and I'm ready to reveal the Christmas Tree of 2012.  If you remember the tree from last year, you will definitely notice a slight difference in this years tree. First, it's a completely different tree! How's that for different! :) After 17 years of decorating trees as part of my career, we broke down and bought a pre-lit hinged Christmas tree. After dealing with the ginormous yard sale tree (and the massive undertaking of lighting it) last year, I knew that I couldn't handle it this year, so we bought a nice small tree WITH lights! I decided to donate the other tree, by the way. I had this puppy up in less than 15 minutes.

 A lot of the ornaments are handmade from over the years. I made these snowflakes using Stephanie Lynn's tutorial. Click HERE to see her tutorial. Yep, those are clothespins!
 The little mushroom ornament is new this year.  Isn't it cute?
 Very neutral, with a lot of browns and metallics with a tiny bit of green.
 I don't know what is up with me this year, but just like the front door, I didn't use any ribbon. See more of the mantle HERE.

 Anywhere.

 Some evening shots.


I hope you are inspired!

Joining Sarah

2011-12-013

Monday, December 10, 2012

Christmas On The Porch

 The weather has been practically tropical for December in these parts (60 degrees) and I spent about three hours outside decorating. The entry is sort of recessed, about 5' square. You can see how I've decorated in the past HERE.

 First, I cleaned and swept...and I think the door could use a coat of paint...but I am not doing that right now. Anyway, please notice my fantabulous Smith and Hawken black metal planters. Total yard sale steal...I think I ran to them...I could not believe anyone would give them up, they are perfect. They sort of led the way for the look this year.
 Now, you might think it's odd...but for some reason, I have been reusing a lot of things that I used for Halloween for Christmas. I know, right? Weird. I used these branches for 'spooky branches' with orange lights (you might have seen the picture on Instagram)...but they are perfect for Christmas too. I wired several of the branches together to form the base...they nearly go top to bottom.
 Then I used some pine and berries and pine cones to create the focal point. I kept hem-hawing about whether to use the red berries or not, but decided with allllll the greenery the red would draw your eye.
 So what is missing? You'll be shocked, I know I am...no ribbon!!! It's not that I didn't want to use any...I was too lazy to drive to my studio and get any but I think it's ok without it...but don't be shocked if I throw some plaid or burlap in there. It's my natural tendency to gravitate towards using ribbon, so we'll see how long it stays ribbonless. ha, ha
 For the planters, I cheated a little. They are pretty tall and I didn't  have enough greenery to fill it completely, so I popped a terra cotta pot in there to fill up most of the room.
See what I did there? Sneaky.
 I only had a few branches left after making the swag....but it's just enough to give the planters some interest.
 Some garland and lights above the door and I'm calling it done. I don't think I'm going to do anything else. I usually do lights on the gutters and wreaths on the windows, but unless Justin volunteers to help, this is it. (Justin, if you are reading, that's not a hint.)


Have you decorated outside yet?


2011-12-013

Thursday, December 6, 2012

Acorn Cap Wreath (A Tutorial)

 Remember a few years back when I made an Acorn Cap Ornament? Check out tutorial HERE. Well, for some reason, this year, I thought it would be a good idea to do a wreath in the same fashion. My friends, what was I thinking? My hands are still aching...this craft is not for the faint of heart. You've got to really make a {craft}commitment and get 'er done.
First things first, harvest a bazillion acorn caps. I grabbed a Walmart bag and Logan and I picked up a ton of caps. Just to make sure there are no little critters, heat the oven up to 200 degrees and leave them in there about an hour then let them cool.

 Pick out what sort of wreath you'd like (size and whatnot), just make sure it's a hard Styrofoam type. Paint the wreath in Burnt Umber craft paint so the green doesn't show in between the caps.
 Begin the process of pushing the caps into the foam wreath. Have a hot glue gun handy for the ones that are wanting to fall out...but most stay pretty well.
 Do a staggered pattern, but it does not have to be perfect.
 Once the  wreath is filled, you can certainly leave it as is, but I wanted to have a little glitter (like the ornament), I just like the added sparkle.
 I used some chocolate satin ribbon to hang it over a mirror...but you could use any color/style ribbon you'd like.
(check out my hair growth!!!)


 The one thing that I should have done is paint the back of the wreath in burnt umber, especially since I hung it over a mirror...
 But other than that, I think it was worth the effort. I like it mixed with the cedar garland, mirror and sconces.


Now, I've got to get that tree done!!! :)

Joining Kate
2011-12-013

Tuesday, December 4, 2012

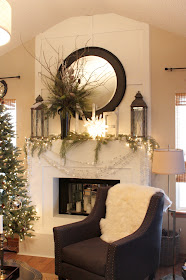
Christmas Mantle 2012


 Well, I finally brought all the fall down from the mantle...it was a little sad...but I threw on some Christmas tunes and went to work. I stripped the mantle completely down to the mirror. I keep thinking I'm going to try my Mom's mirror over the mantle for a change but I just love the round one so much, I never do.

 Since I'm trying to keep it plain and simple, this is what I came up with. The rustic lanterns (you might remember seeing one of these in THIS tablescape) are one of my favorite elements. As soon as I saw them, I knew I wanted them for my Christmas mantle...and lanterns just say comfy-cozy to me.

 I haven't even started on the tree yet, in fact I'm not even going to talk about the tree yet....we'll talk about that as soon as I get it decorated.
 Do you remember when Justin made my 'Fall' letters? See the tutorial HERE. He made me a 'Noel' while he was at it...well, he made an N, E and L and I thought it would be rather fun to come up with an abstract O. I tried a few things before I remembered this tree topper, a moss ball, one of the twig balls...but I thought the more light the better.
 For the arrangement, which is my favorite element, I used the vase that I recently sprayed black (I used it last for Halloween, take a look HERE). You might not think of black with Christmas, but I thought it was ok with the room as a whole. Branches and long needle pine with some snowy branches to tie in the white.
 Inexpensive snowflake garland hung across the face of the fireplace.
 Egads, it looks a little Vanilla...but decorating the tree will help bring in some color.
 I'm sure I'll do some tweaking as I get further along.

 It is a lot different from last year's mantle, no ladders involved or massive swag over the mirror....but I do like it.
 Evening shots:

 See? Doesn't it just make you feel warm and fuzzy? :)

 I hope you are inspired!
Joining Layla

***
Thank you for all your love and support in my last post, I really can't express how much your words encourage me and help me keep moving forward! I'm so glad I'm not alone.
2011-12-013