
I wanted to share these topiaries I created last week just in case you didn't catch the Handmade Holiday series over at Under the Table and Dreaming
I absolutely love looking at them and I will be creating a bigger one. Hope you enjoy!
I absolutely love looking at them and I will be creating a bigger one. Hope you enjoy!


Here is what you will need:
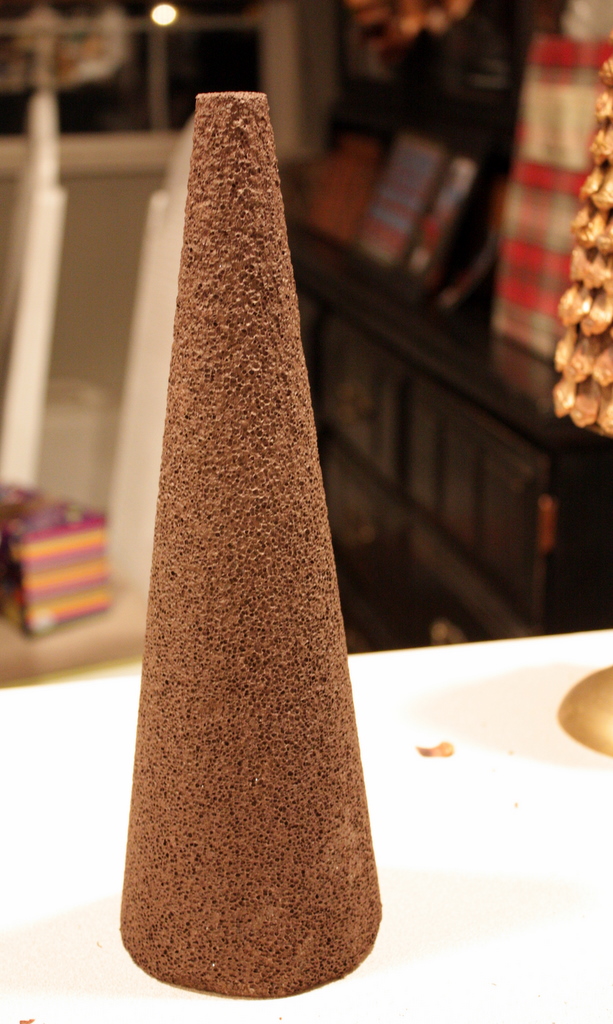
2-12" STYROFOAM brand foam cones
Hot Glue Gun
Mod Podge
Burnt Umber Craft Paint
Gold Spray Paint (not pictured)
Martha Stewart Glitter in White Gold
Heavy Duty Scissors
Paint Brush
Pinecones
I have always collected pinecones and have them readily available, but if you can't harvest them yourself, you can certainly buy them by the bag at your local craft store (and they are usually scented, bonus!).
I have always collected pinecones and have them readily available, but if you can't harvest them yourself, you can certainly buy them by the bag at your local craft store (and they are usually scented, bonus!).
The very first thing I did before I cut was mist each pinecone with gold spray paint, not total coverage, just enough to give them a little metallic sparkle.
Once the gold paint dried, I cut the 'petals' off of three medium (6") size pinecones. I thought that it would take a lot more, but only three. Using heavy duty scissors, cut off all the petals and set them aside. It might look difficult, but I promise, it is really easy. With the heavy duty scissors, I was done in no time.

Next, paint the foam cone with burnt umber craft paint and let dry. This is so you don't have any white peeking out from in between the petals.
Once your foam cone is dry, it's time to start gluing the petals on. This process went really quickly. Don't waste your time gluing each petal on one, by one, go ahead and run a line of glue and line the petals up side by side. Do not worry about the cut ends being perfectly straight, the ends will be covered by the next row.


Keep gluing the petals on, in an over-lapping brick pattern. See how the gold paint gives it just a little bit of light?

Once you reach the top, invert and glue some of the petals to keep the cone shape

Once you have covered the entire cone with petals, now it is time to add a little glitter.
Using a paint brush, lightly brush Mod Podge on the petals. Do as much or as little as you'd like.

Sprinkle glitter on the wet Mod Podge, and knock off excess. The glitter really adds a finishing touch and really, what project doesn't look good with glitter? :)
I worked around the topiary, row by row, the Mod Podge dries too quickly to try to cover the whole thing, so just work in sections.
 Once everything has dried, you have created beautiful Pinecone Topiaries! They look beautiful alone, but I did elevate one on a vintage brass candleholder, to add some height. I adore the rustic, woodland feel of them and love the added sparkle!
They are certainly a welcome addition to my holiday decor and now I want to make bigger ones!


How exciting, my Christmas theme this year is rustic. I grew up in the Southwest, near the Rockies so rustic Christmas' are my favorite especially now that I live in a mid-Atlantic state. I have a collection of Christmas moose (I'm obsessed) and our Christmas tree has a rustic theme. I've been looking for rustic decorations but haven't seen many. I'm so glad you posted these, I'm running out to get my supplies to create some. Any more rustic ideas? Thanks for sharing!!! Happy Thanksgiving holiday weekend :)
ReplyDeleteI myself decided for 2013 to do "rustic" Christmas theme but forgot about Mooses, so thanks for the idea and maybe black bears too? Not sure just throwing it out there, have all year to think about it-
DeleteI love this!!
ReplyDeleteMichelle: These are just beautiful! I appreciate the tutorial and I definitely think that these will be part of my Christmas decorating! Tricia
ReplyDeleteOh, how I love these! You did a wonderful job! I've been looking for some pine cones. We really don't have many pine trees around here so I was looking to buy a bag and I just can't find any!
ReplyDeleteBe a sweetie,
shelia ;)
These are so cute! I'm also drooling over your deer.
ReplyDeleteperfect, thanks for the tutorial!
ReplyDeleteYour creations are the best - just featured your waterless snow globe tutorial on my blog!
ReplyDeleteThanks for all of your inspiration!
www.thesweetlifestudio.blogspot.com
You've made creating the pinecone trees look quite doable. Thank you!
ReplyDeleteGorgeous! May have to try these :)
ReplyDeleteI LOVE these! I hope you don't mind if I feature you and your project on my blog. Thanks for the inspiration!
ReplyDelete--Katie
www.blah2beautiful.blogspot.com
Creatively Living Outside the Box
magnifique! Revenir au naturel il n y a que cela de vrai.
ReplyDeleteMerci pour le tuto.
Cordialement
Pascale
These are lovely! Pinning now.
ReplyDeleteLove love love these trees. I have a million pine cones and have been looking for a long time for a nice craft beyond wreaths or just filling buckets. Just wanted to share with you that I saw a very very similar tree to your tutorial in a catalog and they wanted $50 for these trees! It didn't say how big the tree was but I'm betting it wasn't much more than 12" tall. So thanks again for a fab craft tutorial! I am definitely making some of these! A friend and I were talking how you could also do a light white on them and make them look like they were dusted with snow.
ReplyDeletethat is so fabulous. i don't know why i associate the trees with xmas, they don't have to be. they are just perfect for winter! love them!
ReplyDeleteI love this! so rustic and warm... I'm your newest follower and within minutes have placed you on my sidebar as one of our favorite places to visit. Please follow us back and feel free to link up to our Holiday link party http://stirizsisters.blogspot.com/2011/11/holiday-diy-gift-cataog-link-party_18.html
ReplyDeleteCorie @ Design DNA
Wow! How pretty I can't believe you made that. It looks like it took a long time.
ReplyDeleteThose are beautiful. I just bought one of those tree cones last week. Now I think I'll get a couple more. Great tutorial!
ReplyDeleteI featured your trees on my blog and thought I for sure should introduce myself!!! They are DARLING!!! I'm your newest follower and would love for you to come visit and follow me, too!
ReplyDeleteAimee from ItsOverflowing.com
http://www.itsoverflowing.com/2011/11/simple-dreamy-feather-trees.html
Hi Michelle! I'm currently working on my pine cone topiaries! It's taking me a while because I keep running out of pine cones. Anyway, will send you an email maybe once I get through. Thanks for your lovely ideas!
ReplyDeleteLove these, Michelle! You are so talented. I'm looking forward to following your blog and your Etsy shop. Looking forward to more inspiration! Patti
ReplyDeleteThis recipe is terrific! Made it with my mom yesterday and it was perfect! It turned out what we expect. If you are looking for more tasty and delicious recipes -- Now is the right time to make one just watch the videos and follow list of recipes at gourmandia and gourmetrecipe for more exciting and delectable recipes. Have fun!!
ReplyDeleteThese are beautiful! I can't wait to make my own.
ReplyDelete