Tuesday, July 19, 2011

Dandy Chandy

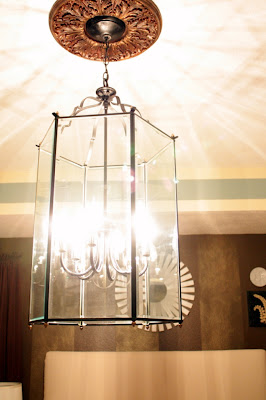
Since the remainder of the fabric for my chairs has yet to arrive, I thought that I would makeover the chandy that I recently bought for the master bedroom. Let's start another project while we're waiting right? :) This isn't necessarily the most dramatic chandy makeover, but the added drama to the room is what I was after. And I do like a big chandy. I liked what I had up there before, it just wasn't big enough. I Justin will be hanging it in the walk in closet. You can catch a glimpse of it HERE.


I found this baby at the Goodwill for a steal....great piece, just not in my favorite finish. I looked past the shiny brass and knew it was the shape and size I was looking for.


I wanted something big, dramatic, and lantern-ish. It's definitely big, 30" long by 17" wide. This would not have worked had it not been for the tray ceiling in the bedroom.


On to painting. There are a lot of different ways to use spray paint and here is what I find works best for me. I always, always, always prime, especially metal. I use clean metal primer and it covers like a dream. I like to leave it over night to really cure, by the next day, the surface is ready to accept paint. For spray paint, I typically use Krylon, in this case I used glossy black. I find that I use less paint when I prime, not to mention a much more durable finish. Again, I like to let the paint cure another night. After lots and lots of spray painting projects, this is what works for me.


I chose to mask off the glass instead of taking it out. I was afraid I wasn't going to get the chandy put back together right, so I masked. Here is a tip: Once I had unscrewed the little triangle screw caps and taken out the lighting part, I screwed them back on. Not only does this make it easier to prime and paint, it protected the threads from getting sprayed.


Goodbye brass, hello black! I primed, I painted, I happy! :)

My guys hanging the chandy, don't they look so happy about doing it! Ha! I don't remember what they were talking about, but I'm sure it wasn't about being happy hanging this heavy thing!


It works! I had this vague fear that after all the work I put in it (and the work in hanging it) that it was at the Goodwill because it didn't work. Luckily, that fear was unproven! Shew!


I cleaned it all up and it looks fantastic in the room. One other step that I did, which was hard to photograph. I used Rub-N-Buff (in antique gold) on the little triangle screw caps. It was really a great detail that talked back to the other gold in the room.
You might ask yourself why didn't I just leave them the original brass, well I wanted them to be antique gold and wanted some of the black showing through. It's really a detail that isn't noticed right away, but I think it helped it stand apart from just a standard black paint job.


I think it was worth all the effort!


If you've got one, I hope you are inspired to paint that brassy chandy!


The bedroom is coming along, I can't wait to show you everything that's been done, and see how far it's come (and see what will still need to be done :)! Here's a little sneaky peaky!




Wednesday, July 13, 2011

Progress on New Chairs

Remember the chairs I scored a couple of weekends ago?

I have been missing in action for days, so I thought I would take a minute to share some of what I've been up to. All of it's good, don't worry. Not only have I been working on the new chairs, but the master bedroom is in the works too, Lord help me. I'll probably show you that progress on the bedroom soon too, and hopefully a reveal not too long after that. But anyway, I'm talking chairs tonight. I finally narrowed down my fabric choices.....and they finally arrived yesterday (I ordered online). This linen in oatmeal was in the running along with a turquoise linen. Then I found this green and it finally hit me what I wanted to do.


The chairs are all primed and ready to be painted. I hope to paint tomorrow, and these beauties will be a glossy white. Even in the primed state I was happy with my decision to go white. The existing foam is in great condition, but I wanted to beef it up a bit, I found the beefy foam at Hobby Lobby. Oh, and I took off the metal doo-dads and instantly knew they are not going back on...filled the little nail holes, and it's as if they never happened!


I wanted the chairs to be very tailored. They are a little fancy (for me), so I wanted the fabric to be fairly modern and fresh looking. I didn't want them to lean on the french side either, that's definitely not my style. So instead of rushing into anything, I took some time to find exactly what I wanted. So here is my idea, use the oatmeal linen and then some how trim it out with the green. Remember now, that I am not a seamstress, so I had to figure it out. It's taken all evening to figure it out, but I finally did.


I recovered the seat in the linen.


It looked pretty good, especially with the added foam.


Then I made the green fabric into trim/piping...I cut it on the bias and everything, although I had to look up how to do that! :) I used the cotton filler cording from Wrights. I think it's generally used for pillows, but it worked like a charm for this too.


Finally, I stapled it all around, right along with the linen, flipped it over and it looked great. Surprisingly, what was in my head actually came out. So I've done the first one and now I have five more to do. I've got to get some additional fabric on order (since I finally made a decision) and then I will be all finished with my Goodwill chairs. I'm so excited! I have one other little idea about painting, I'll be doing a test on that tomorrow!


Thanks for sticking around and reading, I know my postings have been erratic. I hope you'll come back and see how these turn out!
On a side note, did you watch the first episode of Design Star? Luckily the full episode is on the HGTV website so I am able to watch.....That's the only thing I miss about not having cable, HGTV! I think the designers will give us something to watch this season!


Wednesday, July 6, 2011

Painted Doily Tee


Have you all met Rachel at Maybe Matilda? She has mad crocheting talent, and has fun projects like her Floral 'Love' Tee, Scrappy Floral Skirt and Painted Doily Tee, which is the project I tried. I don't usually do any re-fashions, but this was so easy, right up my alley, I just had to try. I did do mine a little different, she used colored paint on a white tee and I used white paint on a colored tee. Either way you do it, I think it looks so cute and fun for summer.


I had everything on hand except for the textile medium that was a little hard to find. Not at Walmart, not at Michael's, finally found it at Hobby Lobby. If any execs of the two former named stores are reading, if you carry craft paint, you should carry textile medium. Thanks.


So here's what you will need: Craft paint, textile medium, paint brush, paper doilies, inexpensive tee shirt.


My tee shirt is from Walmart ( 5$), they have tanks (4$) that I think would look cute too. You might have a plain tee already. I found the sunflower paper doilies at the Dollar Tree, but the regular paper doilies (which Rachel used) are available all over if you prefer that shape.
Wash your tee (without fabric softener), and lay out the paper doilies in a pleasing manner.


Put a piece of cardboard in the shirt to prevent bleeding to the back, I used a pizza box top. Mix the textile medium into the craft paint, be brave and begin painting, concentrating on the little openings and the outer edge. Basically use the doily like a stencil.


I made sure to let the pattern go off of the shirt, I did that on the bottom and around the neck.


Let the paint dry then heat set it by ironing wrong side with a pressing cloth or towel. That's it! It is ready to wear! Is that easy or what?


Doesn't it kinda look like tie dye? Thank you Rachel for a fun idea! Be sure to visit Maybe Matilda and see all of Rachel's projects.


Photobucket


UndertheTableandDreaming


Monday, July 4, 2011

Summer Mantle

Happy Independence Day! I hope everyone is having a fantastic holiday weekend! Since the kiddies were at the Grands, I was doing some much needed cleaning and a little foo-fooing too, usually one follows the other, doesn't it? :)


I love a good mantlescape, so I hit there first. I like to change mine seasonally and since it's officially summer, seashells and flowers were the main players. With the new suzani curtain panels, all kinds of different decorating opportunities have arisen arise come up. I am able to use a lot of different colors and textures, which I am really loving.


The mirror never changes...I keep thinking that I am going to do some abstract art and hang over the mantle in lieu of the mirror, but I really like the black and white contrast, you probably know this from seeing the kitchen.


For an asymmetrical mantle, I like using two good size "anchors" on each end. I love using florals on one side and typically candle holders on the other. That's kinda the formula I stick with. The living room is not big at all, but because of the vaulted ceilings, I can go pretty tall, big and chunky. I like using over sized objects and then fill in around them.


I also like leaning one or two pieces of artwork or pictures too, here I used just one and a collection of starfish and shells


At first, I did a floral arrangement with primarily orchids, but it was looking a little too tropical than I wanted so I went out in search of some lillies. I found them in beautiful rusty orange, however, they look a little more red in the photos. They are blooming everywhere in nature, so they were exactly what I wanted.


The original with just orchids, I like both of them, but I wanted lillies!


I've tried using that vase a trillion times before the curtains, but with them, now I can use a lot of earthy textures on the mantle that just didn't seem right before.


Some other details going on around the room....everything here thrifted (ginger jars spray painted, check out how they looked before HERE :) I love that little dish.


I found a fantastic bowl at TJ Maxx this weekend (I love a good bowl). This bowl could work everywhere! I rarely find orange accessories, so when I do I snag them up. Right now, because Logan is on a building kick, I filled it with wooden blocks.


This is the bowl I found thrifting a couple of weekends ago, I filled it with various shell balls. I told you I love a good bowl!


Thanks for stopping by, I hope you are inspired to create a summer mantlescape!


Need more ideas? Take a peek at the Pre-Spring and Spring mantlescapes. Click HERE and HERE.


The Shabby Nest


Visit thecsiproject.com