Did that title get your attention!?! :) he he he! Sorry, I just couldn't resist! I haven't really been drinking, but I have {still} been collecting bottle caps and came up with another project just in time for the 4Th of July. If you'd like to see my other bottle cap creation, a bottle cap tray, click HERE.

Now this was my first time doing this so in retrospect there are a couple of things I would do differently, which I'll list later. Over all, I think it turned out cute. I wanted to hang this on the front door instead of a wreath, but I will have to bring it indoors should the weather get bad. It is not weather resistant.
Here's what you'll need:
Bottle caps
Scrap piece of board, I used MDF
Krylon spray paint
(Global Blue, Cherry Red, and Glossy White)
Glue gun
2 Eye screws
Patriotic ribbon
Wired Star Garland
Chipboard letters (USA)

Now I will not lie, this was one tedious project. The gluing of the caps seemed never ending...but if you can persevere, it'll be worth it. I was going to hire it out, but my teenager wanted too much money, so I went ahead and did it myself. :)
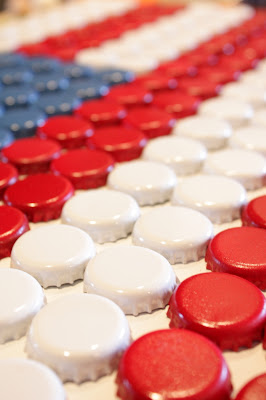
The number of bottle caps will be determined by the size of the board you're using. I used over 200 {gasp} and the size of mine is about 13 X 19. Odd I know, but it was a scrap after all.

First of all, determine your number of caps by laying them out on your board, sort of a dry fit, so to speak. Determine which will be painted blue, red and white, and separate them, I just eyeballed it. Spray prime them and let them dry, I used cardboard to paint them on and labeled each one the appropriate color so I wouldn't get mixed up...

After the primer has dried, spray on the 3 colors. I used Krylon paints because it dries really fast and you can quickly do 2 or 3 coats. However, I didn't do this all in one day, I let the primer dry over night, and then the final coat of paint over night. I also painted the board white. Now the gluing begins, make sure you have plenty of glue sticks handy, two squeezes of the trigger gets just the right amount of glue per cap.

Keep gluing and gluing and gluing.....
until you've turned old and grey covered your board.
I wanted to use ribbon as the hanger so I measured in about four inches and used an eye screw on each side of the top to tie the ribbon on.

Attach the ribbon of your choice, I had this flag ribbon on hand, but I saw some cute ribbon at Michael's when I was buying the wired star garland. I made a bow with the star garland and attached it around the eye screw and then tied a small bow with the flag ribbon and wired it on too, leaving some nice long tails.

I used some silver letter stickers and put USA on the lower right hand corner, just in case it wasn't patriotic enough. :)

It is ready to hang on the front door! It looks really festive when you're walking up the walk.

Ok, in retrospect, I think I would rather have the "stripes" in single rows.... a single row of red and white vs. double like I have it. It wasn't until I hung it up did I notice that it would have looked better that way, sometimes I forget to step back from a project. I might change it, but then again, I might be being a little too anal.
Secondly, I should have painted the board black and then the caps would have seemed to be floating, which would have been way cooler, oh well.

All in all, I love how it turned out and it is totally original.

I hope you are inspired to keep collecting bottle caps and put them to use! Thanks for stopping by!


 There are a lot of cute dresses for summer, be sure to visit Shabby Apple. click HERE.


