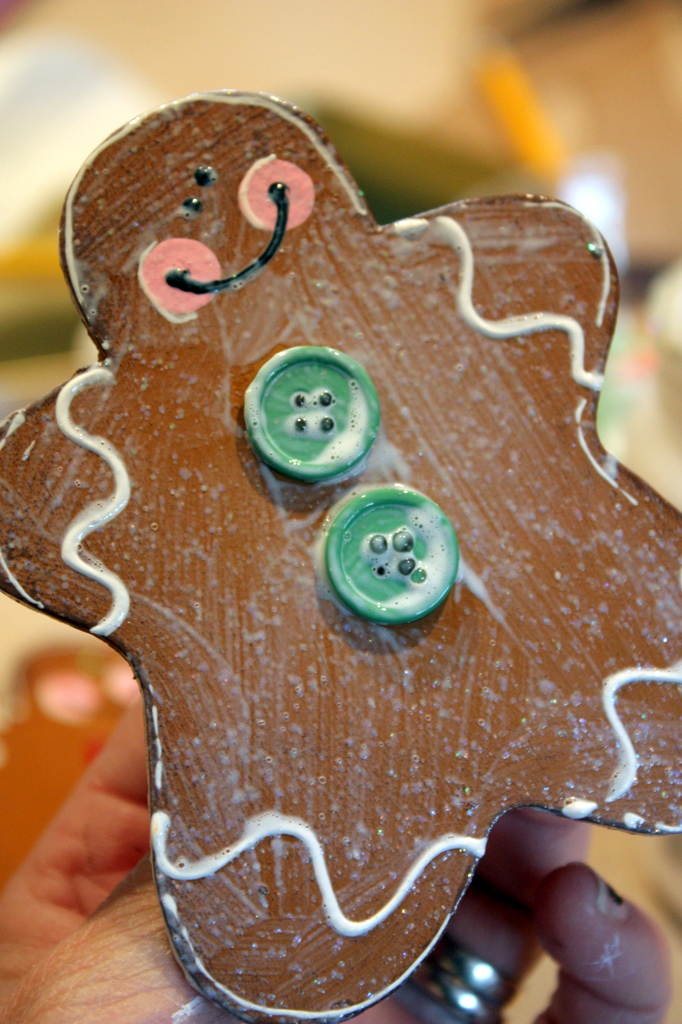
Here is a fun craft that you can do to hang on a tree or decorate a package with....really the possibilites are endless, let's get started!
If you would like to create the felt poinsettias that you see here on the wreath, check out the tutorial HERE!
Wooden Gingerbread Men
(Which I will abbreviate GM, because I'm too lazy to spell it out anymore)
Craft Paint in Golden Brown, light pink and Burnt Umber
Fabric 'Slick' Writers in black and white
Sparkle Mod Podge
Buttons/beads
New pencil (with non-used eraser)
Paint brushes
Clothes pin (and hot glue gun to glue it on)

You can find GM in the unfinished wood area of any craft store, but I like the shape of the one from Hobby Lobby the best. They come in a pack of three for around a dollar.
You'll begin by giving the GM about three coats of golden brown paint and let dry. You'll want to do both sides and the edges too, so it looks nice and neat.

Next, you want to give the GM a 'cookie' look with a gnarly brush and burnt umber paint....just around the edges.

Once it's dry, use the unused eraser end of a pencil and dip into light pink paint and give that GM some rosy cheeks. That wasn't a run-on sentence was it?
Let dry.

Slick writers I get at Wal-mart. They have them over where you get stuff to make your own t-shirt area. It's for fabric, but it works fine with this too and dries with a raised surface, which is great for a 'frosting' look.
With the white slick writer, give him some frosting and use the black for his eyes and mouth. You have to kinda have a steady hand, but the tubes are pretty easy to use. Of course you can personalize the face however you'd like too...I like mine a little cock-eyed. :)
Let everything dry and glue on some buttons or beads.

Glue the clothes pin on the back. This makes it super easy to clip any where...stockings, trees, gifts, etc.


Tooo cute!
ReplyDeleteSo cute! Thanks for sharing! My son and I will have to make these :-)
ReplyDeleteSo cute!
ReplyDeleteWow! You are a Christmas crafting genius! So glad I found your project via Centsational Girl.
ReplyDeletePlease stop by for a visit to my blog. I am currently in the midst of a Gifts to Make series.
Be Merry and Bright!
Pauline, Pretty neat. definitely will try.
ReplyDeleteDarling. On my "gotta make" list.
ReplyDeleteJust found this tutorial via all free Christmas crafts. LOVE it! Definitely on my to do list! :)
ReplyDelete