Monday, August 15, 2011

Let's Go To Cimarron Flea Market!


Well friends, I found yet another flea market that was out of this world. If you travel along I44 between Springfield and Webb City Missouri take exit 29 and you will find Cimarron Flea Market. It doesn't look very big from the outside, but looks can be deceiving, it's pretty big. Not too big though, just right, you know how sometimes they can be a little overwhelming. I dragged the kiddies and my MIL along and spent the afternoon roaming the aisles. The weather today was just right, so that means it wasn't too hot to shop. Sometimes the flea markets aren't air conditioned and are just too hot to enjoy. It's no fun if you're ringing sweat!


What was interesting is, that as 'junky' (in a good way) as it was, the junk was pretty well organized. I mean, if you are looking for kerosene lamps, camp lanterns, decorative plates, lamps, scales (like pictured above), black panthers (not kidding), elephants, etc......there is an entire booth (sometimes more, sometimes less) dedicated to it. What struck me too while wandering the aisles, how many years did it take to establish such 'collections'!


They had lots of great mirrors


Snow shoes anyone? Would these be great for a lake house or what?


Great chandys too, I wanted to take this one home.
I'm pretty sure it was made out of resin, but it looked like carved wood, it would be a great piece for an entry or hall. So pretty.


Love that amber glass one on the right...


Lamps. Very cool.


Look at these license plates, it was crazy how many!


Logan taking a break in front of a fan, poor kid!


More lamps


I didn't photograph much of it, but this was a gold mine of skulls, mounted animals, antlers, and more. I even saw a mounted Caribou that was ginormous. I am often drawn to skulls like this because it reminds me of Georgia O'Keeffe. Skulls were a source of inspiration for her during her years in New Mexico. So I admire these in an artistic manner, so to speak.


Keegan playing with an old "Colorburst 250" Polaroid camera (they had a camera section :). Cameras of yesterday.............


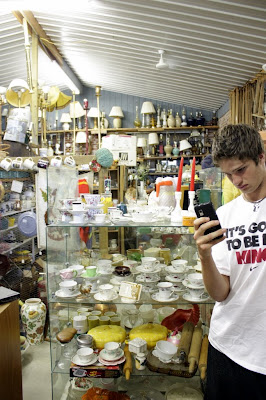
Cameras of today !:) We were having fun!
(When did that kid get taller than me?)

Some of the decorative plates

Brass and silver section.


I bought one of these brass leaf plates, I love the look of them. I hope I don't regret not getting both of them!


This cute fella came home with me too. Doesn't he remind you of the clockwork owl in The Clash of the Titans? Not the new one, the Hunky Harry Hamlin version.

Here was one shelf of the owl section...not quite the type I like though. ;)


Lots and lots of stuff!


I thought this was pretty cool, very 'Scooby Doo' looking....you know that episode The Ghost of Captain Cutler where the gang encounter the ghost of an old sea diver? OK, maybe not, but it was really neat. I could totally see it as a prop in a seafood restaurant.


I was seriously tempted by these chicken coops, especially after seeing what Heather did with hers, but I refrained.


Getting ready to leave, but I had to do a little more looking around out side, I just about wore everyone out! Except that little one, he has more energy than the bunny (you know which one I'm talking about).


Still outside. An entire basket of those glass insulator things.

Well, I hope you have enjoyed a litte tour of Cimarron Flea Market. Did you go thrifting this weekend? What did you score?


Just to let you know, the kids start school this week so I won't be around very much. Logan is starting kindergarten and Keegan is a freshman and I'm a little nervous about it all.Wish us luck!


Thursday, August 11, 2011

Changing Artwork To Suit Your Needs

I like to show you different ways of creating and displaying artwork because if you're like me, you just can't go out and buy high dollar art on a whim. A lot of what I do is based around a 'use what you have' mentality and this project is a prime example.


This project was on my left-to-do-list for the master bedroom...one down a few more to go. You remember the inspiration fabric right? I used the fabric to pull paint colors.


I had to do a little of mixing. To get the right color, I started with Canyon Orange and just kept adding red until it was close to Tiger Lily (the color of the coverlet).


So here is the piece. My MIL bought it for me years ago, back when I did a blue and brown palette. It's made from some sort of suede like fabric. It's a great piece and I didn't want to lose it just because I wasn't using blue anymore. It hangs right above one of the dressers and I have a round thingie (you'll see below) that looks great right in front of it.


BEFORE:


AFTER:


I painted out the blue and added a little grey, the rest of the colors were perfect.

So does this give you any ideas? Do you have any pieces of art you can change?

Thanks for stopping by, I hope you're inspired!

Did you miss the progress on the Master Bedroom? Click HERE


The Shabby Nest


Monday, August 8, 2011

Master Bedroom: It's Coming Along


The fabric that I ordered finally arrived and I completely love it. It was exactly what I wanted and even though it was my second choice (read about my first choice HERE) I'm so thrilled with it. I've ordered some other fabrics too, but they've yet to arrive. I didn't want to order anything else until I was sure I liked the main fabric. So a little more waiting, but I went ahead and made two pillows from my lovely new fabric.


I want to give you a little background on the master bedroom. It was the first room we painted when we moved in seven years ago....


.....and this is why. It was a terrible, terrible shade of lilac that the former homeowners had painted. I refused to do anything in the house until this room got painted. The color was just gross. I wanted to create a cozy and comfy bedroom and really flex my design muscles so I chose a dark brown. Seven years ago, I was on the "blue and brown" train (that I've since gotten off of) and wanted a dramatic wall color accented with blue. Justin and I tackled the project together. I painted the base color; Coffee Bean, Justin doesn't like to paint. To create a little interest, I thought stripes would be just the ticket. Once dry, Justin and I spent about 3.5 hours dry brushing a gold glaze over the coffee bean. The next day, Justin taped off 12 inch stripes and I came back behind him with the coffee bean and created the stripes. Good times. We worked as a team and it was one of the first projects of many to come in our new house.


Fast forward seven years, my taste have shifted, and I was ready for a change (wink, wink). So I started picking out paint colors and bringing chips home for Justin to help me decide on the new paint color. He's (usually) pretty easy going with all my decisions and supports me 100% but when I started talking about painting the bedroom room, he got stubborn! The gall! I couldn't believe he didn't want to paint the bedroom! "It's just paint!" I tell him. He's feeling a little, let's say; attached and nostalgic about "our first project" in the house. So the coffee bean is staying, I decided to play nice and compromise. :) At least it's not this purple anymore!!


So working with the brown walls, I decided to go with black, white and orange palette in addition to brown. I've been using orange in other parts of the house so it was an easy choice for me. I've been trying to pull this room together for months now and I am determined to finish it. I found a great coverlet in 'Tiger Lily' at West Elm on sale and Justin bought it and two euro shams for me for my birthday. It came in and I love how it looks. I went on the hunt for fabric to coordinate, and found a great Schumacher fabric.
After finding out I couldn't afford it, I found this alternative. It was still expensive for me, but I only needed one yard for a couple of accent pillows. It is perfect and had all the colors I needed. I did that a little backwards, I usually like to find the fabric and then the bedding, but I have had things sell out right before my eyes (online) and I didn't want to miss out on the Lexington bedding (it's not easy finding orange bedding! :).


Here it is, isn't it beautiful?


Anyway, I still have a few projects to complete, but I thought I'd show you the progress so far. I'm glad that we've decided to keep the brown, I really like how white looks on brown.


My dressers are old, just to give you an idea....my Dad bought them for me when I first moved out of the house and they were old then. They are totally vintage! ;) I am still deciding whether I want to white wash them or not, we'll see. I didn't use the mirror that was attached to the dresser, I found a big frame at the Goodwill , spray painted it white and had a piece of mirror cut for it. I used my DIY wall shelves under a couple of thrifted frames. Above that a couple of thifted decorative plates. I made myself a shell wreath for above the mirror to complete a very symmetrical look.
I wanted some symmetry over the dresser because I did a gallery wall across from the bed. Pictures of the boys and Justin.... all the frames thrifted and spray painted white. The tall dresser is a project that I am really excited about, you should see what it started from. I named it the Chain Link dresser. I'll be showing you how I did this in the days to come. You might remember the leaf art, it use to hang in the living room. I recently found that little leafy mirror and layered it right over the top of the frame, yes that was intentional. :)


A close up of the pillows and bedding. I just love the honeycomb pattern on the coverlet, it adds a lot of texture.

The lady on the dresser was my Mom's, circa 1963. She was always in my house growing up and now she'll live in mine. :) I've always loved her as a kid and thought she was so exotic looking.


I recently painted my lamps, again. This is a Krylon color called Saddle Tan. This is my first time using this color, but this color is in the fabric and also the curtains, so I tried it out. I'm liking it.


This chair and the desk behind it is on the project list... new upholstery for the chair and a new slipcover for the desk.


So here is what I have left to do:


Buy two more curtain panels


Do different slipcover for desk


Recover and paint chair


Alter some existing art (add colors of fabric)


Get rid of blue stripe around tray ceiling


What I'm still considering:


White washing the two dressers


Changing headboard


DIY Projects you can try out yourself:


DIY Sunburst Mirror


Spray Painted Lamps


Leaf Poster Artwork


Painted Chandy


Wall Shelf out of Curtain Rod Holders


Painted Black and white Dresser


Thanks so much for stopping by, I hope you're inspired!


*EDITED*
Here is the link to the fabric that I chose:
Richloom Chandler in Spice


Tuesday, August 2, 2011

Living Room Changes


I told you yesterday how excited I was to have found a vintage painting of the ocean. I decided that I wanted it to be featured on the mantle, so a little rearranging was in order. You know how that always happens...I'm a perpetual accessorizer (is that a word?)


Of course since I only dust biannually, I had to do the cleaning that goes along with the rearranging. ;)


It had all started with the bookcases anyway, so the end result was a nice and tidy room that lasted ohhhh, about the length of time that it took to take the pictures and it was back to normal. But at least I have documented proof that it is capable of looking nice. :)


I found a nice and simple black frame in my thrifted frame stash, I just left the glass out of it and the painting looked great.


I changed out the vase, simplified the flowers, added thrifted candle holders and placed the painting. I immediately loved the look.


Whoever the artist is, they did a great job, it's hard to capture crashing waves correctly in paint. I know, I've tried!


Daisy decided to go sleep somewhere else, so I put one of my favorite pillows in the chair. Yes, that's the same chair I showed you months ago that I have yet to chose fabric for. Shame on me.
Next, I accessorized the coffee table. I love having a round coffee table in front of the sectional, it seems more natural to me, but sometimes round tables can be a challenge. Here I used a round bowl (with shell balls), a round mossy ball, and for height a round cylinder vase. I know you've seen me use my vases 101 thousand different ways, and here is the 102nd. Three little taper holders take on a whole new look placed together inside a vase. To anchor them and keep them from wobbling around, I used river rock.


I don't know if you can see it well enough or not. Books always make sense on a table, the square shape offsets the round shapes. Finally, something organic, like my tigerlillies. While these are permanent botanicals, they still make a great statement.


I love how my new old painting looks and I will definately be on the hunt for more. Thanks for stopping by, I hope your inspired!


Want to see a few more pictures? Check out my photostream HERE.


Monday, August 1, 2011

Look What I Found!


I couldn't wait to show you what I found this past weekend! An unframed original piece of artwork of my favorite subject, the ocean. I have been enamored with vintage paintings for quite some time. I have NEVER EVER found any until this weekend!

I also found a smallish watercolor and grabbed it up too. I think it is so fantastic!
They are both signed, by some unknown artist. I just love how both the paintings feel, some story that I'll never know, some cast offs from a painters sketchbook. I love to think there is some mysterious and sentimental story attached to each one. I wonder what it is! :)


I can't wait to find a frame to put my new artwork in. I'm quite sure I will find something in my stash of thrift store frames to fit it.
I will probably have to go get some matting cut for the watercolor.


Do you like to collect old paintings?
Did you go thrifting or Antiquing this weekend? What did you find?