Saturday, November 20, 2010

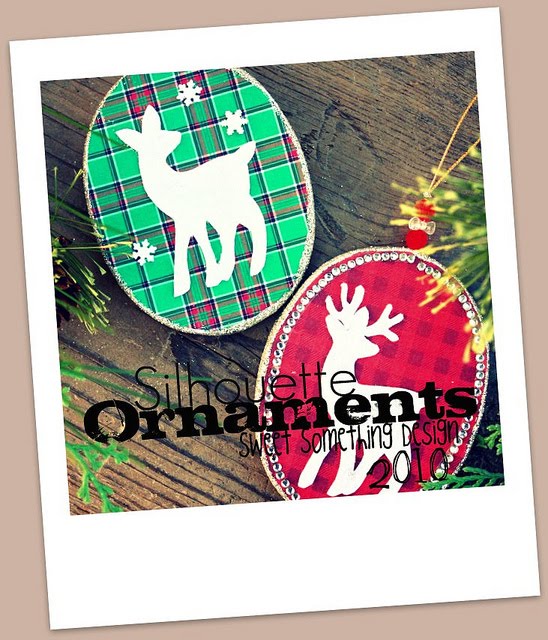
DIY Woodland Silhouette Ornaments


Here is a great DIY Christmas ornament that you'll love doing!


Here's a list of things you need:


-Assorted scrap booking paper (at least 2 colors of your choice)

-Glitter (color of your choice)

-Scissors

-Plastic beads

-Stiffened Felt (Craft Store)

-Oval paper mache disk ornament (Craft store)

-Mod Podge

-Paint brush

-Paper trimmer

-Various embellishments

Other items that you'll need that I forgot to get in to the picture: exacto knife, sanding sponge and Martha Stewart Tinsel glitter (I just discovered this stuff!)


Also, this is a great project that is up to your own interpretation! It can be any type of paper, glitter and silhouette you'd like, really anything goes! It's all up to you, and your style!


First step is to prep your paper selection. Use a paper trimmer to cut paper to size about 3" by 4". You can use the same on both sides or coordinating papers. I used coordinating papers. Apply glue to one side of the ornament and put it face down on the paper. Smooth it out with you fingers and then trim excess off with scissors. Don't worry about the edges, this is where the glitter goes.


The edges are rough from trimming, but use a sanding block (or fine grit sandpaper) to sand off the edges for a smooth look. Wait for the glue to be pretty close to dry before sanding.


Next, get your silhouette's ready. I bought a package of little felt deer (light brown deer below) thinking that they would be great, but the color just didn't work. I even tried painting them, but the felt didn't take the paint very well, except for one that you'll see further down. So I decided to use the deer as a pattern and cut them out by hand. I even made some girl ones. :) I used stiffened felt as opposed to regular felt, just to make it cleaner and easier to cut out, yet still have the look of felt. It's found in the same section as regular felt.


Glue silhouette to the ornament using Mod Podge and let dry. Now it's time to embellish.
Apply Mod Podge to the edges of the ornament and sprinkle on glitter. I did one side at a time, just to make it a lot less messy. I used the same glittering technique I used here.
Let it overlap the front of the ornament a little.
I did each ornament different, embellishing some with diamonds, some with snowflakes.


During this project, I discovered Martha Stewart Tinsel glitter, it was really fun stuff. After the regular glitter had dried, I went back over with Mod Podge and just used the tinsel glitter as an accent. I did one of the ornaments with just the tinsel glitter and while pretty, I thought it was just too much.


Here is the only little deer that that liked his paint job!


These snowflakes are pre-cut too, I found then in my stash, they look great too.


Finally, I used plastic beads to fancy up the plain hanger. Just slip the beads on and then knot it so they don't slip back off. I found that between 3 and 4 beads were best, any more and it was too busy and started taking away from the look of the ornament.


This project could go so many different ways, and a great project for kids too!


Thanks for stopping by and I hope you are inspired and give this a try!


UndertheTableandDreaming


giveaways

Tuesday, November 16, 2010

Charlie Brown Thanksgiving


I know that Thanksgiving isn't being served on a ping pong table, and Snoopy is not serving, but I couldn't help but think about this classic Peanuts Thanksgiving show, especially after I found my new-old camp blanket. Brown and yellow, unusual yes, but it is so 1973!


I found this great blanket while thrifting this past weekend (I have a thing for camp blankets, see another example here), and since the weather is still tolerable, outside I went. It is not my usual color pallet, but I knew I had yellow and brown plates, and with a few other elements, maybe I could pull together a great table. Doesn't it look like the colors of Charlie Brown's shirt?


I decided to keep the table pretty simple, pine cones and a twiggy candle centerpiece

Using a wooden charger, two glass vases, that fit into one another, gathered twigs, acorns, and a little ribbon make up this centerpiece. Kind of modern meets rustic.


I cut each twig to the height of the vase, and put them in between the two vases, the candle goes on the inside of the second vase

I used acorns around the outside and tied some yellow ribbon around the vase. It was looking a little plain, so I stuck some wispy twigs around the top too.


Wicker chargers, yellow dinner plates, and brown salad plates make up the place settings.


I struggled a little finding napkins in my stash that would go with the camp blanket, but ended up going with some brown and cream napkins with a great trellis pattern


My everyday flatware and glassware keep it casual.

Huge NC pine cones on each place setting and down the middle of the table


I have to show you the cute little felt owl napkin holder that Justin's Grandmother made for me, I love his ruffle eyes!


I love pine cones!

When the sun started going down, I snapped a few pictures of the centerpiece lit, it's getting dark soooo soon now! Daylight savings time is going to hamper my photo shoots!! :)


{I forgot to mention, I put the candle in a bed of rice to catch the wax}

Thanks for stopping by!I hope you're inspired!

Pardon the flipping back and forth between Christmas Projects and Thanksgiving! I think I'll get one more Thanksgiving table scape out {maybe} and then onto Christmas!


Joining Susan at Between Naps On The Porch


Wednesday, November 10, 2010

Upcycled Ornaments


Just like with everyday decor, I go through my Christmas ornaments and decor to edit. To see what I am just not in love with anymore, to giveaway or sell ornaments that are just not my style anymore.

So while sorting and editing, I ran across these great finial ornaments. Great size. Great shape, but I don't use them. I realize that I very much like the shape, just not the color. So I decide to do a little upcycling.
What's upcycling? You might ask? My response: "It's taking something that would otherwise be thrown out and finding a way to make it into something else." Enter glitter. Now if you've been to my Etsy Shop, you are well aware of my love affair with glitter. Antique Silver glitter to be exact, so naturally, that's what I did. I mean, everything looks better with glitter.


So here's what you're gonna need:
Mod Podge (and small bowl to pour it in)
Glitter in your choice of color
(specifically Martha Stewart Glitter)
Paint Brush
Container for glitter

First, get a container ready. I used one of those plastic containers from the deli at Wal-mart, emptied and washed, of course, they have a great lid and are perfect for rolling my little acorns around....anyway, any container will work. Basically it's to catch the glitter, and because I'm a glittering fool, I store the glitter in it. I don't bother putting it back in the bottle.


Because of the size of these ornaments, about 11 inches, I did the bottom half and then the top half, letting it dry in between. Using a paint brush, coat the ornament with Mod Podge.


Sprinkle the glitter onto the wet glue, over the container. Let dry.
Once the bottom half is dry, do the top half. Let dry.
Now you have ornaments that you love once again! Of course with all of the colors that Martha has with her glitter line, you can really customize your look. I find her glitter to be the best on the market. It's practically magic. It doesn't matter what color anything is, the properties of the glitter covers anything!


I also upcycled some glass balls and tied little silver bows on each one.

Yes, glitter makes the world go round!


Thanks so much for stopping by, I hope you're inspired!
Don't have the time? That's ok, click on my Etsy button I've been glittering for you too! :)


UndertheTableandDreaming

Monday, November 8, 2010

Walnut to White


It's no secret that around these parts, second hand is second nature. I especially like finding inexpensive mid century design furniture with straight simple lines that I can lug home. I lugged this dresser home, not recently, I've had it for years. I'll have to let you imagine, I don't have a before shot. It was a typical walnut {not heirloom quality} high boy dresser, no hardware, just these little finger grooves under each drawer and simple legs.
So far, this is what I've done to it over the years: painted it green, added hardware, and replaced the legs (keeping the originals) until I saw this picture:
(Source Unknown, but if you know please comment!)

EDITED: Image via Decorpad

I love everything about this inspiration photo, from the trellis design on the wall down to the metallic heels, and especially the squirrel! The sideboard is fantastic, the ring pulls are great and I love the nail detail (if that's what it is).
Now while my dresser is obviously a different shape, I knew I could take the elements I liked from this sideboard and apply them to my little dresser. So it got a coat of white paint, new sleeker pulls, and I changed the legs out {again} because I wanted this as a side table in the living room and needed it lower. Can you guess what I used for legs? You guessed it, fence finials, all I will say is, have you priced bun feet lately? Ouch.
She was looking better already. Continuing with white in the living room since the fireplace face lift, white has been an on going trend, and I'm really liking everything. So white was a natural choice.
Next comes the nail detail. I had some upholstery nails left from my inspiration board project, and I used every last one for this. I will tell you I was nervous about it, but if you could see it in person, it is worth the stress! At any rate, it would be easy to patch any holes.
I love the detail that it added, while still staying modern looking, and even though it's still a little taller than the sofa, it's going to make a great side table, with the bonus of storage. It was super simple, the upholstery nails went in the wood just like nails...just a combination of a little measuring and eye-balling. Bun feet would probably get it down to the right level, maybe I will invest in some.....
Time to accessorize. Fall is creeping it's way out and neutrals making their way back in. My spray painted ginger jar, painted faux antlers, and painted Wal-mart tray....I don't think I told you that I spray painted a second round tray green, so I have an orange one (for Summer) and a green one for everyday.
I hung my Mothers mirror over the dresser, I will never do anything differently to this mirror. It's from when my parents got married in 1963, and it hung over the sofa in the living room for my whole life. I did put additional hardware on it to hang vertically. I love it.
The lamp is super mod, love that mixed with the old pieces, finishes it off!
I think my little dresser has had it's final make-over, I love it.
I hope you are inspired and thanks for stopping by!!


