Wednesday, November 30, 2011

Christmas Touches and Details

Thank you so much for all the lovely, and funny comments on my "Twas the night before Christmas" poem. I just had to do it that way you know....you just can't blurt that sort of thing out, you must create a poem when you find a deal like that!. :) The funny thing is, and this goes to show what a goofy goober I am, the day after I came up with the poem, I couldn't stop talking to myself in rhyme. Everything had and exclamation mark too. :) I probably have some sort of disorder that my inner dialogue rhymes all the time, anyone heard of that?


***


I would like to offer more pictures (cause you know I can't stop) and some links and details and some sources, although, most everything has been collected over time.


I know that it is always a battle between fresh or faux, but too many people in my family has tree allergies, so faux we go (dang it, there I go again).
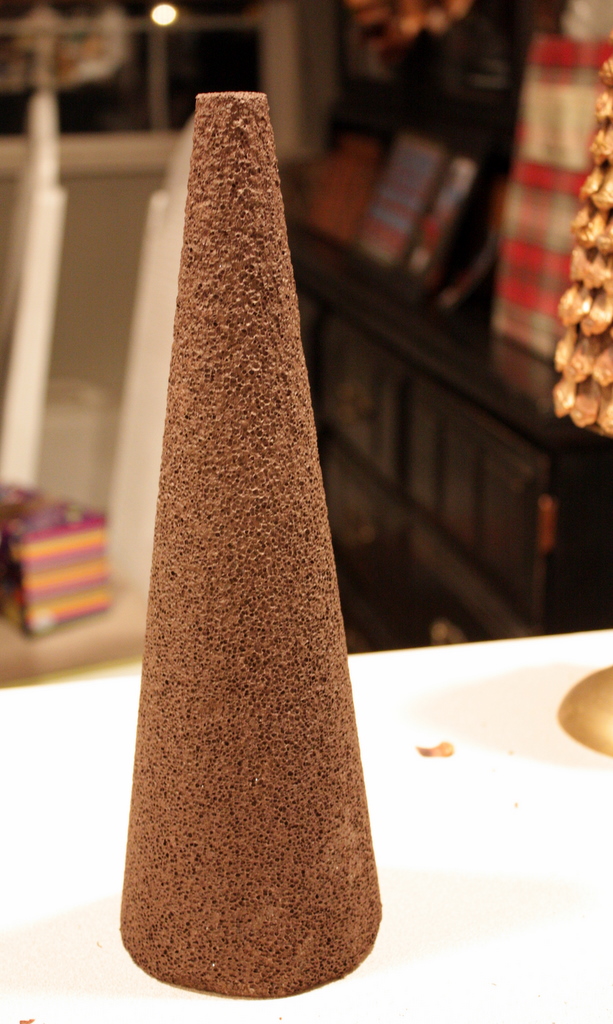
Even as a kid, mom and dad both were allergic and we always had an artificial tree. My sister still uses Mom's tree to this day.
I used my pinecone topiaries on the mantle. As soon as I made them, I knew exactly where they would end up, I really love them. Someone commented that they had seen something similar at Target, so I was in there the other day and they are so painted and glittered that you could barely tell they were pinecone petals. I highly recommend the DIY version. :)
See how to make your own HERE


I even made a third one using a 14" cone. I put all three of them on candle holders because the ceilings are high in the living room, so for me, the taller the better,


I have a collage wall over the sofa and while I didn't change the arrangement, I did change the fall tree prints. I found this botanical book at an auction that had illustrated pictures, so I used three pictures of conifers. I kept the same frame and matting, just put in the pine pictures. The fall trees are just behind now.


My block art still looks good as the centerpiece. Check out how I made it HERE.


When I saw this owl pillow cover at West Elm, I just had to splurge (sorry it's no longer available). It is embroidered with a button closure. I think he looks really cute and the perfect colors too.


I made the Noel banner just like I made my Fall one using burlap and painted the lettering. I added a couple of rusty bells on the end for fun.


I found this fantastic wood grain ribbon at Joann's. After the tornado, they set up a satellite store at the Mall, which I despise going to (the mall that is)...but I needed some burlap for the Noel garland. So I ran in and found this great ribbon. It must have been destiny. I joined it with some platinum netting ribbon that I found at Michael's. I know not everyone is into ribbon, but for me it's like 2 1/2" wide fabric. :)
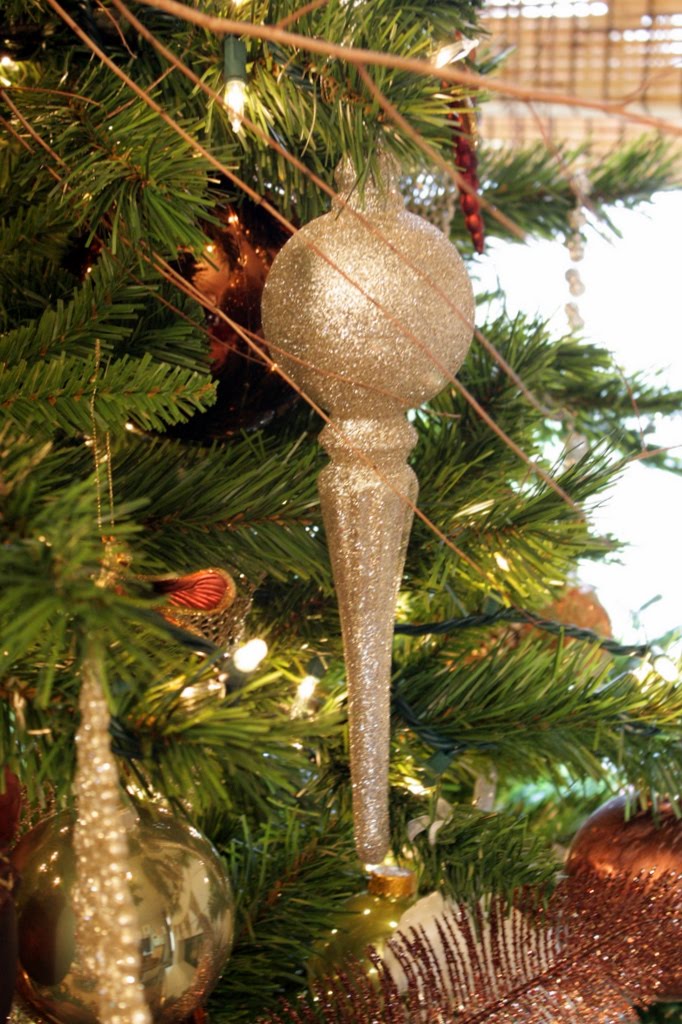
I stuck some other platinum floral and sticks around the ribbon to help balance off just how big around the tree is. I tried to use the the finial topper that I have (you can see it HERE), but it was just too small.

These glittery feathers are new this year too. I found them at Michael's. They've got all kinds of crazy colors, but then I saw the brown ones...they add a lot of texture. They bend and twist too, which I thought was great.


I have collected all sorts of pinecone ornaments and my favorites are these ginormous ones. They are 10" long, so they demand a little extra attention. I tied a little bow and added some rusty jingle bells (Hobby Lobby) and a touch of floral.


I get lots of emails about the mirrors in the firebox....they are 4" mirror tiles usually found with candle holders at places like Hobby Lobby. I think they are suppose to be candleholders, but they are just small versions of beveled tiles to me. I used hot glue to adhere them because I don't want them to be permanent. Not too bad looking for a non-working fireplace, candles are the next best thing to a fire, right? :)


I'm still putting some Christmas touches in the kitchen, so I will share that next week.
I've got a tablescape coming tomorrow and a fun craft for the weekend.

Come back!

My other Handmade Ornaments on the tree:


Need a design boost? For advice and guidance on style, contact me!

Tuesday, November 29, 2011

A Christmas Poem: My Eight Foot Tree

Twas the height of yard sale season and all through the hoods, I search high and low for dazzling vintage goods. Typically, the children are still nestled, all snug in their beds while I have visions of furniture and accessories dancing in my head. Off I go with a roll of thunder, yard sales and garage sales to plunder!


When out on the lawn of a house nice and neat, I encounter a big tub and an eight foot tree! Away to the women I flew like a flash..."How much is the tree, I'll give you cash!"


A dollar she exclaimed, but I couldn't believe, what could be wrong with that eight foot tree? "Nothing" she answered, "and all the pieces are there..." I welcomed her answer, if I dare!


As dry leaves that before the wild hurricane fly, I jumped in the car and waved bye, bye! Fast forward to now and gaze upon the tree. It's eight foot tall as you can see. What the fair lady failed to mention was that eight foot tree girth dimensions!


I spoke not a word, but went right to work and decorated the tree, I was going berserk! It's too big and dowdy, I thought with a pout, my head was swimming with all sorts of doubt!


I persevered and kept right on going. With ribbon and bells and pine cones and more, I decked out that tree, it finally started flowing!


Finally, I finished and I am happy you see, I'm tickled pink and glad I bought my eight foot tree.


So here we are at the end of my story, my eight foot tree in all her glory.


This poem inspired by Twas the night before Christmas by Clement Clarke Moore with a little Dr. Suess thrown in for good measure. :)
Thanks for reading! More Pictures and details coming soon!


Need a design boost? For advice and guidance on style, contact me!

Saturday, November 26, 2011

Sweet Something Sale!


Thank you so much for your patronage!


Need a design boost? For advice and guidance on style, contact me!

Friday, November 25, 2011

Pinecone Topiary

I wanted to share these topiaries I created last week just in case you didn't catch the Handmade Holiday series over at Under the Table and Dreaming
I absolutely love looking at them and I will be creating a bigger one. Hope you enjoy!


Here is what you will need:


2-12" STYROFOAM brand foam cones

Hot Glue Gun

Mod Podge

Burnt Umber Craft Paint

Gold Spray Paint (not pictured)

Martha Stewart Glitter in White Gold

Heavy Duty Scissors

Paint Brush

Pinecones

I have always collected pinecones and have them readily available, but if you can't harvest them yourself, you can certainly buy them by the bag at your local craft store (and they are usually scented, bonus!).


The very first thing I did before I cut was mist each pinecone with gold spray paint, not total coverage, just enough to give them a little metallic sparkle.


Once the gold paint dried, I cut the 'petals' off of three medium (6") size pinecones. I thought that it would take a lot more, but only three. Using heavy duty scissors, cut off all the petals and set them aside. It might look difficult, but I promise, it is really easy. With the heavy duty scissors, I was done in no time.


Next, paint the foam cone with burnt umber craft paint and let dry. This is so you don't have any white peeking out from in between the petals.


Once your foam cone is dry, it's time to start gluing the petals on. This process went really quickly. Don't waste your time gluing each petal on one, by one, go ahead and run a line of glue and line the petals up side by side. Do not worry about the cut ends being perfectly straight, the ends will be covered by the next row.


Keep gluing the petals on, in an over-lapping brick pattern. See how the gold paint gives it just a little bit of light?


Once you reach the top, invert and glue some of the petals to keep the cone shape


Once you have covered the entire cone with petals, now it is time to add a little glitter.


Using a paint brush, lightly brush Mod Podge on the petals. Do as much or as little as you'd like.


Sprinkle glitter on the wet Mod Podge, and knock off excess. The glitter really adds a finishing touch and really, what project doesn't look good with glitter? :)
I worked around the topiary, row by row, the Mod Podge dries too quickly to try to cover the whole thing, so just work in sections.


Once everything has dried, you have created beautiful Pinecone Topiaries! They look beautiful alone, but I did elevate one on a vintage brass candleholder, to add some height. I adore the rustic, woodland feel of them and love the added sparkle!


They are certainly a welcome addition to my holiday decor and now I want to make bigger ones!


UndertheTableandDreaming


Thursday, November 24, 2011

Happy Thanksgiving!


I hope that you are spending time with the ones you love.


I am so thankful for all of you that stick around, read and follow along, thank you so much.


Pumpkin Pie, here I come!


Need a design boost? For advice and guidance on style, contact me!

Tuesday, November 22, 2011

Waterless Snow Globes


This is one of those crafts that I said last year: ".....I'll do that next year"... lo and behold, it is next year and I'm finally doing it! You should too, it's really, really simple and looks oh so cute.


Here is what you need:


Glass jars/bottles


Bristle trees


Powdered snow/Snowflakes


White gold Glitter (optional)


Mod Podge (optional, for glittering)


Glue gun


Clean metal primer


Glossy white spray paint


The first thing that you'll want to do is prime and spray paint the lids of each jar and let them dry (overnight is best). I chose white, but of course you could do red, any color you want.


Next, I glittered the trees with white gold glitter, this is just a little added detail....this step is completely optional, it just added a little shine.


I used all sorts of bottles, from pickle jars to baby food jars....try to match up a tree that is in proportion to your jar.


Hot glue the trees into the lid:


Pour snowflakes into jar, screw on lid,


flip over.....they are ready to display! I didn't feel the need to permanently secure the lid, the hand tightening seem just fine.


I placed mine in the window sill in the kitchen, but of course, you could display them anywhere.


I think they would make a cute centerpiece or on a mantle too


Too cute!


I hope you are inspired to give this a try, it's too easy not to!


Thanks for stopping by!


Tip Junkie handmade projects


Need a design boost? For advice and guidance on style, contact me!