Wednesday, January 25, 2012

How I Spent My Homegoods Giftcards


Hi everyone! I am back from St. Louis, doctor appointments out of the way, I did some picking for my booth space and spent my Homegoods gift cards. An all around productive trip. My MIL always goes with me, so we have a lot of fun on our little trips. Just in case you don't remember, I won Kate's Tablescape contest back in December. I won $100 to spend at Homegoods. Well, I've been holding on to those puppies for a while and finally spent them up on this trip.

My MIL took all these pictures for me, and believe me the employees thought we were a little crazy. Finally, one of them asked what the heck we were doing, so I had to explain how I won, and now we are here, and how I wanted to blog about it....blah blah blah....don't they understand I just couldn't spend up the gift cards and not BLOG about it! Blank stares, then "Oh".


I purposely waited for my trip to St. Louis because it's a ginormous city, which means the stores are stocked really well. Big city=More selection. Of course, as I am looking through these pictures, you can see the colors that I'm drawn too...I'm even wearing the colors I like, I didn't even realize it. (aqua, grey, orange....etc). I liked a lot of items in the store, and I could have spent more than the gift cards (that's why they do those sorts of things after all) but I had to save my real money for picking.


This dining chair caught my eye and I liked the chrome swing arm lamp too..good job pairing modern and traditional!


Of course I couldn't go to Homegoods with out going through the extensive dinnerware section, I really like this navy and white ikat-ish dinner plate and salad plate. I was thisclose to buying those, but they didn't have a setting for six, which I wanted.


Aisle after aisle of lamps, I'm surprised I didn't select one or two of them.


I like these euro sized pillows, the fabric reminded me of the Thomas Paul fabric.


I ultimately ended up with this ginormous urn and it's smaller brother. I envision them on my mantle for sure.


Artwork is another strong area for Homegoods, the current trend of canvas art, present and accounted for...I liked what that smaller one in front says....if you fail to prepare, then you prepare to fail. How true is that?? One of you graphic artist need to make a printable of that saying so I can pin it. :)


Other artwork I liked, I love poppies.


More pillows, the orange caught my eye.


Yes, I am this goofy, you can't take me anywhere.


I really like this orchid pot too, on top of the list, but didn't make the cut.


They also had great rugs, and huge too. Prices for the 9X12's a mere $300.00, not bad at all.


Great colorways, great starts for any room.


These little wire occasional tables were really cute, and in several colors.


So I came home with some great new accessories, and oh yeah, a cutting board (I needed a new one). I'm really grateful for being chosen as the winner, I had a great time shopping!


Thanks for all the comments on my laundry room, I was offline until today so I'm just now getting to your emails and questions. Thanks for your support!

I was really nervous about putting so much of ME out there in this post, but I'm trying to be a little more fearless, like Tobi said; "What do you have to lose?" Love that girl.

Look for a post specifically about the flooring in the laundry room soon! See you then!


Need a design boost? For advice and guidance on style, contact me!

Thursday, January 19, 2012

Laundry Room Reveal

I'm Done!! I'm done!!
OK, so my weekend project turned out to be a weeklong project....you might have noticed, but the laundry room is finally finished. I'm still in that lean-in-the-doorway-and-stare phase, but I'm really thrilled that I have a weeks worth of laundry to do {NOT}!! Really though, this is the first project checked off my goals list for the new year, so when I put it in that perspective, I think we did pretty good.


The demo went REALLY quick, what took the most time was the floor.....but I am over the moon how it turned out. I will share the step-by-step on the flooring a different day, so be looking for that soon.
Anyway, let's get started on the tour.


The laundry room is a small room in the corner of the kitchen. It is small in size, but I wanted it to have a lot of personality. The rest of the kitchen/living room is neutral, so I felt like I wanted to really add a pop of color.
The wall color is Aqua Chiffon (A58-3) from Olympic Paints (Lowe's)


This is what I started with, it's bad I know....this is probably the worst case scenerio. Cluttered, disorganized, white walls, wasted space, but so much potential.

BEFORE:


The single changing aspect; hanging cabinets. Already changed my life. I found out many moons ago that I'm not an open shelving girl, so the cabinets cleaned up a lot of the visual clutter for me. I bought them unfinished (which is money saving) and painted them with left over paint from the kitchen facelift. Justin hung them the exact height of the kitchen cabinets, 54" from the floor. I helped a little. ;)

AFTER:


I found a new ironing board cover at Target, which is actually a huge detail. It ties in the grey striped ceiling and grey baskets. A clock that I spray painted, and a fun owl print I found on Etsy from THIS wonderful artist.


I thought long and hard about what type of flooring. Two things I knew: I couldn't put a ton of money into it, and I wanted it different. In the end, I decided on a ceramic tile in a herring bone pattern.


I will go into greater detail later, but it really makes me happy, and even happier that we did it ourselves.


I found this two gallon glass jar at Walmart...I have wanted to do this FOREVER...put the laundry detergent in a pretty glass jar. Yes, I'm easily amused. I was even further amused that the scoop that comes with Gain coordinates too. :)


Selecting knobs was fun, I looked at all the home improvement stores, but found these fun glazed ceramic ones at Hobby Lobby. I love the little flower detail and could not have come closer to the wall color if I tried.


The clothes rod has really made a difference (I only had the wire shelf to hang on before), little did I know the ability to slide clothes hangers would be so thrilling!


The dryer completely cluttered, this is not staged people....

BEFORE:


AFTER:

Oh joy.


I debated on whether to add crown molding to the top of the cabinets, but decided to use the space for additional storage and display space. I am really loving the pop of orange in there too.


When we started this project I allotted a budget of $300.00 (not including appliances)

So here's the cost break down:
Paint and Paint supplies:
$55.08
Cabinets and knobs:
$137.23
Flooring and supplies:
$102.06
New Accessories:
$30.10
Grand total: $324.47
$24.47 over budget
Not too bad!


Even though I've got a ton of laundry to do, I am going to be MUCH happier doing it!
I've got a doctors appointments Monday and Tuesday of next week, but look for flooring details soon!


Need a design boost? For advice and guidance on style, contact me!


Thursday, January 12, 2012

Laundry Room Progress (Half Way there!)

Thank you for all the support and encouragement on my little laundry room project. It is really coming along! I love the stripes on the ceiling and Justin hung my antique chandelier last night!!! Yay!

You might remember, I found this crystal and brass chandy at an estate sale several months ago.
A little unusual in a laundry room, I know, but that 's the part I like! :) It adds a lot of character and history with everything being 'new' in here. Besides, I'm the only one that uses the laundry room, and a little bling never hurt my feelings.

I have such a love affair with any light fixture I meet, I couldn't believe anyone would give this baby up......right up until I started cleaning it. 30 crystals and 45 minutes later, I figured out why the elderly couple I bought it from would eighty-six it.
But she's mine now.


You might notice I selected a different paint color...I went two shades lighter than my original choice. Even though I have used Schooner before (I painted a dresser), I think it was just a little too moody for a laundry room. In a walk-in closet, yes, a bedroom, perhaps...but I want this room to be super peppy.....


....and it is.


So what is there left to do?


-Install center cabinet (I have to have Justin's help with this)


-Install hanging rod


-Install knobs on cabinets


-Install flooring


Then it will be ready to move appliances back in and accessorize!


( Yes, I started filling the cabinets already, the kitchen is SUCH a mess right now, I had to do it :)

I'm installing the flooring by myself, wish me luck, I've never done it before! :)

I'll be back with a reveal soon!


P.S. I hit 2000 readers this week, I am so grateful you are here! Thank you!


Need a design boost? For advice and guidance on style, contact me!

Monday, January 9, 2012

Laundry Room Progress


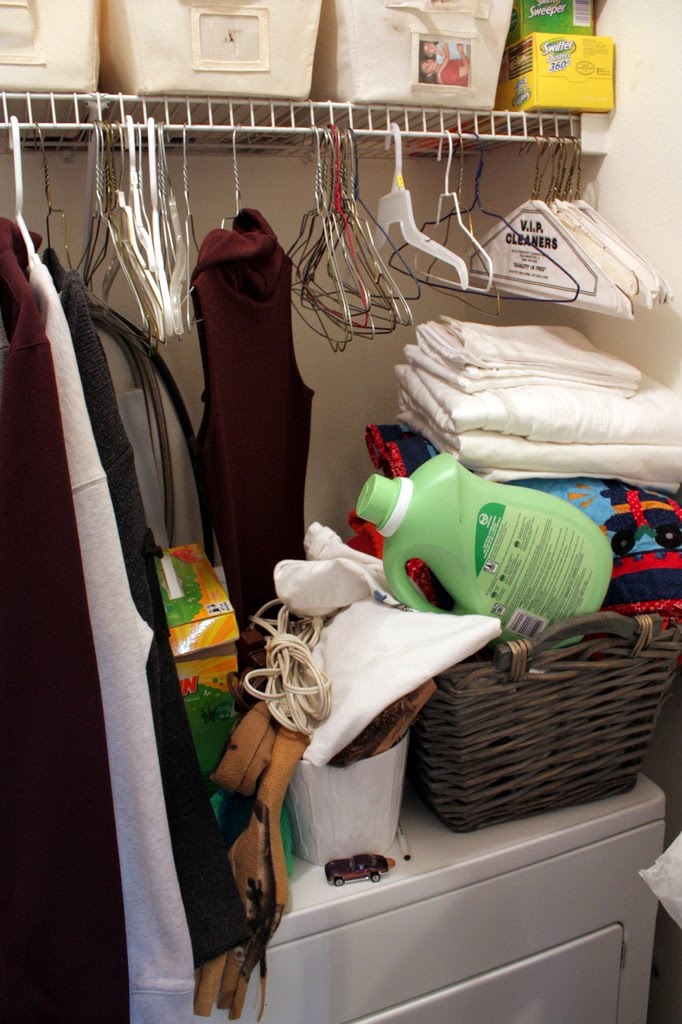
Hello, hello! I have stopped briefly to show you the laundry room, I'm really excited about the progress. This has really been a fun project so far and I'm closing in on the finished project. Are you ready for a dose of reality? Here is the what's what of the laundry room. I am ashamed, head bowed and shaking, but you can see the need for tackling this project. The builder slapped a wire shelf up and called it a day. My poor attempt to organize with canvas totes, and the dryer a catch all for laundry room clutter. I probably don't need to point out the incredible waste of space above the shelf....

So first things first, I cleared the entire room of everything, including the appliances.


The flooring in desperate need of updating. It's also damaged in a couple of areas too so we decided to replace it.


It was SO easy to rip it up, it was kinda fun too, I carefully took off the baseboards and ripped the linoleum up. It gave little resistance and so satisfying to give it the heave-ho. Keegan took my 'action' shot for me. :)


I did have to scrape up some adhesive spots, but it wasn't too bad. The sub floor is ready for it's next life!


I've opened up a can of worms with what I did to the ceiling. We have the dreaded popcorn ceiling throughout the house...and I decided to remove it in the laundry room, just to see how bad it would be. The best method that I have for removing popcorn is a spray bottle of water and a plastic putty knife/paint scraper (plastic is best to minimize gouging). I worked a section at a time, dampening with water and scraping off the popcorn. Make sure to have something to collect the 'popcorn goop', I used a cardboard box and used the edge of it to clean the knife off too. It was practically dust free, still messy, but I didn't worry about a film of chalky dust getting everywhere.

It went pretty quick, and aside from aching arms, I'm glad I tried it.


To reward myself for all that hard work, I added more work. ;) I was thrilled with how smooth the ceiling was, I decided to feature it!! Highlight it with some stripes! I chose to use the same wall color in the kitchen (Bedford Grey from Martha) to paint the stripes and really tie the areas together, the white is the kitchen wall cabinet color (Taylor's Chalk from Martha) This room will be nothing if not fun!


The two wall cabs are painted and Justin helped me hang them. It's coming along people! I'm really excited!


I've got to get back at it! Thanks for stopping by!


Need a design boost? For advice and guidance on style, contact me!

Friday, January 6, 2012

The Laundry Room Begins

Sorry for disappearing on you this week! I spent this week taking down Christmas at the booth, packing away supplies in my studio (where I create wreaths), cleaning the house and doing as much laundry as humanly possible.....because I am starting the laundry room project this weekend! Yeah!

I think that using 'laundry room' is giving it a little more substance than is actually there....it's more like a laundry closet. It's exactly 5X5 square to be exact. So in normal fashion, I peruse the www for inspiration and found lots and lots. What picture hit home with me the most was this picture:


Via


I like everything about it, but what I'm actually taking inspiration from is the placement of the cabinetry. I originally thought that I would hang one center cab in the middle and then have hanging room on either side, but I like this MUCH better.


So yesterday, I went around to every home improvement store until I found the right cabinets and the right price. I got them unfinished because I will be painting them with the same color as the upper cabs in the kitchen, and they are laminated on the inside....so I can skirt around having to paint inside. ;) These are 15 X 30 unfinished oak wall cabinets.


I decided to go with a bold wall color. It's a small area, and I'm feeling pretty gutsy. I think that with the white cabs and white appliances, this color is going to sing. Hopefully it will be my tune. :)


Off to the store again I go, today I'm getting handles for the new cabs, a hanging bar (to go in between the cabs), crown mold and looking at flooring options.


It's going to be a fun day!


Need a design boost? For advice and guidance on style, contact me!

Tuesday, January 3, 2012

A Few Goals for 2012

I spent the day yesterday taking down the Christmas tree and decorations. It certainly comes down a lot quicker than it goes up. Doesn't it? I'm not really sure why, but I'm glad it does. With the New Year here, I'm ready for a fresh start. Really ready.


In actuality, I am not a resolution kinda gal, but I do like to set goals for the new year. Even if some of the goals are 'repeats' from 2010 or even 1999. ..it's OK to roll-over goals from one year to the next. Sometimes circumstances aren't right and it just doesn't happen. I think of it like this: my daily to-do lists are pretty lengthy. I go full steam to get everything checked off the list. If I don't get something done on the list, it gets put on the next days list. For me, it's keeps the petal down, but I don't feel bad about myself if I don't check off everything. That's how it is for the goals for the year list, if it didn't get done, keep it on the list. Keep moving forward.


Another thing that I learned about myself...I am not a 'one word' gal either. I selected a word last year and then promptly forgot it. That's OK too, some things that work for others do not work for me. It's not a one size fits all thing.


So here we go:


1.) Create more wreaths for my shop. I never seem to have enough selection, and I want to improve on that.


2.) Open a new shop for vintage finds ala Etsy. I want this to be a companion to my booth space and offer a lot of awesome finds.

3.) Paint the laundry room. This is the second project in the Kitchen Facelift phase. I've been mildly thinking of what color I'd like to go with, but I haven't nailed anything down yet.


4.) Eating better. I know, I know....how cliche right? Well, I'm going to try. The way that I've eaten my whole life is finally catching up with me. We'll see how it goes.


5.) Exercise on a regular basis (I know, another cliche). I do not have an athletic bone in my body, so hard core weightlifting or marathon running is not what I am talking about. I am on the look out for a routine I can start off with and hopefully stick with. Justin has been eating healthy and exercising for sometime now and I'm finally getting on board. I guess when I started seeing his results, it started making me look a little shabby. :)


6.) Write an Ebook. This was one thing on my list last year and here it is again.


I have a few more personal, unspoken goals that I haven't listed here, but they are on paper. It seems like I have more business related goals (public and private) this year than home related goals. How about you? I'd love to read your goals, or leave me a link.


Need a design boost? For advice and guidance on style, contact me!