Showing posts with label makeover. Show all posts

Monday, November 7, 2011

DIY Chalkboard Project

I hope everyone had a fantastic weekend! The weather has been so {mild} nice for this time of year, I was able to hit a few yard sale and estate sales, if you can believe it. The season hasn't ended yet! :)


I love being in a family that brings me stuff to 'makeover', is your family like that? "Oh Michelle can do something with that..." is what I hear a lot. So when my FIL brought me a ginormus fake oil painting, I knew exactly what I wanted to do.


Here is the 'before'. Can you tell just how big this baby is? It's 32" X 56", it's a biggin'. I think that it once hung in a restaurant. if I'm not mistaken. It's got some nice things happening for it....nice frame, fabric covered fillet, and the sheer size of it.


I took the faux oil painting out and rolled on a coat of chalkboard paint. While that was drying I scrubbed the frame with warm soapy water and painted the fillet. It had several stains (it's fabric) and a little dingy looking, so I used craft paint and painted right over it.


This is how well it turned out, looks good as new.


After a couple of more coats of chalkboard paint, and an over night dry-time, it was ready to reassemble and hang. I did change the direction of the wire to portrait style vs. landscape. Aside from cleaning, I did nothing else to the frame, I love it when that happens!


I hung it on this little small wall we have by the back door and hung it low enough that Logan can have his fun with it too.


As you probably know, you should always 'season' the board before using, which I did and wrote a little seasonally appropriate quote.


I hung my maple leaf garland across the top, just for fun. I broke took off a couple of leaves so it wasn't too long. If you would like to see how to make this Maple Leaf Garland yourself, click HERE. It's a fun project too.


Thanks so much for stopping by! I hope you're inspired to make yourself a chalkboard!


YourSiteTitle


Need a design boost? For advice and guidance on style, contact me!

Tuesday, July 19, 2011

Dandy Chandy

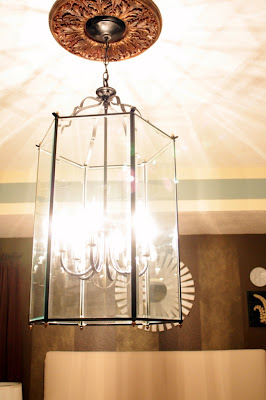
Since the remainder of the fabric for my chairs has yet to arrive, I thought that I would makeover the chandy that I recently bought for the master bedroom. Let's start another project while we're waiting right? :) This isn't necessarily the most dramatic chandy makeover, but the added drama to the room is what I was after. And I do like a big chandy. I liked what I had up there before, it just wasn't big enough. I Justin will be hanging it in the walk in closet. You can catch a glimpse of it HERE.


I found this baby at the Goodwill for a steal....great piece, just not in my favorite finish. I looked past the shiny brass and knew it was the shape and size I was looking for.


I wanted something big, dramatic, and lantern-ish. It's definitely big, 30" long by 17" wide. This would not have worked had it not been for the tray ceiling in the bedroom.


On to painting. There are a lot of different ways to use spray paint and here is what I find works best for me. I always, always, always prime, especially metal. I use clean metal primer and it covers like a dream. I like to leave it over night to really cure, by the next day, the surface is ready to accept paint. For spray paint, I typically use Krylon, in this case I used glossy black. I find that I use less paint when I prime, not to mention a much more durable finish. Again, I like to let the paint cure another night. After lots and lots of spray painting projects, this is what works for me.


I chose to mask off the glass instead of taking it out. I was afraid I wasn't going to get the chandy put back together right, so I masked. Here is a tip: Once I had unscrewed the little triangle screw caps and taken out the lighting part, I screwed them back on. Not only does this make it easier to prime and paint, it protected the threads from getting sprayed.


Goodbye brass, hello black! I primed, I painted, I happy! :)

My guys hanging the chandy, don't they look so happy about doing it! Ha! I don't remember what they were talking about, but I'm sure it wasn't about being happy hanging this heavy thing!


It works! I had this vague fear that after all the work I put in it (and the work in hanging it) that it was at the Goodwill because it didn't work. Luckily, that fear was unproven! Shew!


I cleaned it all up and it looks fantastic in the room. One other step that I did, which was hard to photograph. I used Rub-N-Buff (in antique gold) on the little triangle screw caps. It was really a great detail that talked back to the other gold in the room.
You might ask yourself why didn't I just leave them the original brass, well I wanted them to be antique gold and wanted some of the black showing through. It's really a detail that isn't noticed right away, but I think it helped it stand apart from just a standard black paint job.


I think it was worth all the effort!


If you've got one, I hope you are inspired to paint that brassy chandy!


The bedroom is coming along, I can't wait to show you everything that's been done, and see how far it's come (and see what will still need to be done :)! Here's a little sneaky peaky!