Showing posts with label bedroom. Show all posts

Friday, September 9, 2011

The Skirted Desk


I hope your week is going well, today, I am back in the master bedroom, sharing my version of a skirted table. In my case a skirted desk. I've been wanting to do something like this for a while. I think it adds a lot of visual weight and personality to what might be an otherwise plain piece of furniture and you can pick some great fabric too.


However, I'm not really sure if I should be giving any kind of instruction pertaining to a sewing project, you know how bad I am with sewing, so just keep that in mind. I am an amateur sewer.

I searched and searched but I just couldn't find a tutorial that I could wrap my mind around. So I just kinda stared at the desk for a while thinking and trying to figure out how I could do a fairly simple slipcover and not go insane. And because it worked out, I thought that you might want to try it this way too.


I ordered fabric and it arrived pretty quick......but just sat there until today. I hope you remember this desk, I gave it a paint job and chalkboard top last year. It use to reside in the kitchen, but after the facelift, I moved it into the bedroom and I liked it so it stayed. What wasn't working anymore was the paint job. Since I had been admiring skirted tables for some time, I didn't see why I couldn't try making a skirt for the desk.


Since every one's desk, console, or table will be different, I'll spare the measurements, but I bought three yards of THIS striped fabric and I had a little left over.
Also, because this is a desk, and I need to access the drawers from time to time.....I had to make it easy to lift the skirt. So my plan was to make two panels for each of the ends and one panel for the top and front.

I also created corner panels so there was something behind the sides of the panels and not just space and/or a desk leg. I measured, cut and sewed a hem around three sides, I didn't bother hemming the top edge (on any panel) since it would be stapled and I didn't want the added bulk. The finished corner panels are about six inches wide. I stapled the top of the panel right on the desktop. I also ironed the panel in half so it would be nice and easy to line up and staple. Do both corners.


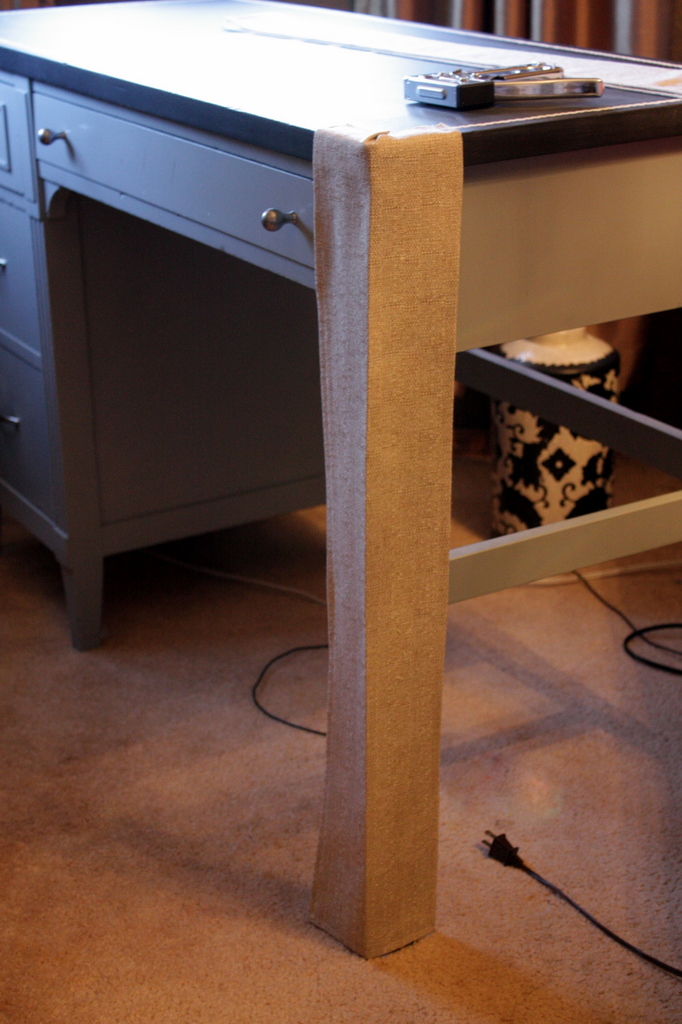
Next, attach each end panels, again with staples.


Once both ends are on, the big panel for the top and front goes on. I had about a half inch of extra fabric, which is where I stapled across the back of the desk. You don't even see any of the staples.


That is it! You've created a custom tailored skirted desk! I put everything back in place and was ready to accessorize (of course!). It is a little strange to me with the lamp on the left, but it really does need to be close to me while I'm in bed.


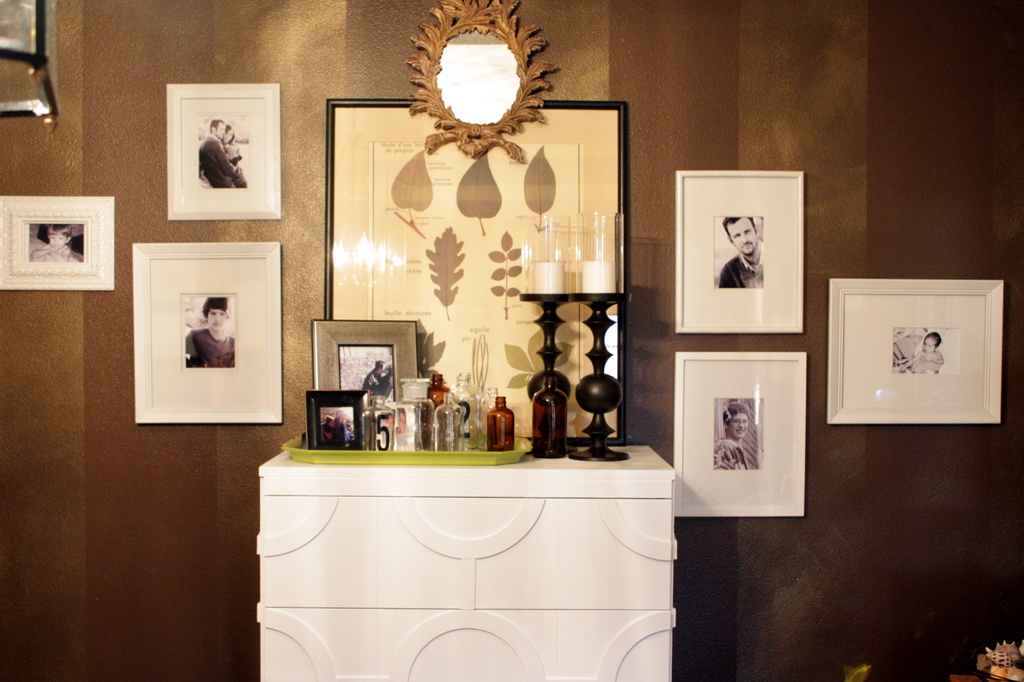
To balance off the lamp, I used a couple of candle holders, books, frames and a little owl. The black bottle was something of my mom's that I ran across in storage while cleaning it out. I really liked it and decided to keep it. I think it might be a liquor bottle or something, I'm not sure. I liked the Egyptian motif on it and think it's pretty neat.


Remember this little owl I found at Cimarron Flea?


I love how the feminine and fancy frame and things look on the masculine stripes


The room is coming together! I bought the other curtain panel , so finally the windows look decent. Now I have to buy some glass to protect it, I'm not in a huge rush though since it's in the bedroom.


Did you notice I found a different chair? I think it's more fitting for a desk. I love the shape of it and I'm thinking of leaving the wood and just reupholster. I think.


I selected THIS houndstooth and I made a little pillow out of the main fabric already! This will make the third chair I've got to reupholster....I'm scared to death to start them!

(Don't you just love houndstooth!)
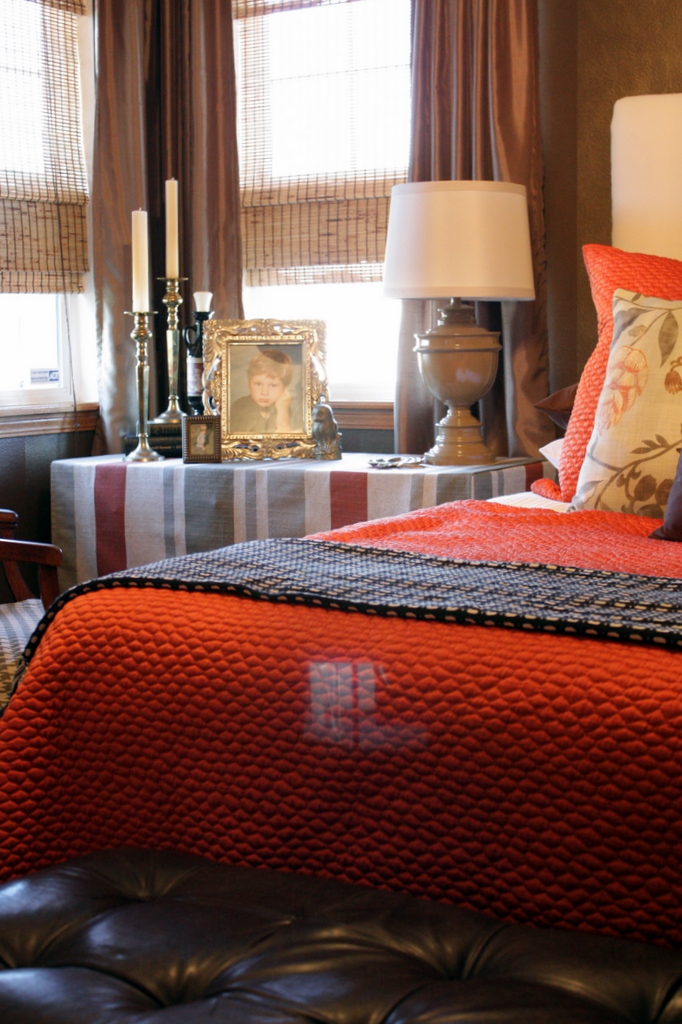


Well, I hope you give this a try, I love the look and it was pretty easy. I know some of you that are accomplished seamstresses, can whip this up pretty quick. If you have any questions, just leave them in the comments.


Thanks for stopping by I hope you're inspired! I've started bring out Fall things, have you?


Friday, August 26, 2011

The Chain Link Dresser


Thank you so much for sticking around even with my erratic postings. I am thankful for all of you who read and comment and welcome to those of you who are new. I've got some exciting things happening in my world and I can't wait to share with you. In the mean time, I'm finally getting around to sharing a dresser project for the master bedroom. I'm calling it the Chain Link Dresser.


If you remember the feature that Erin did on a beach house that is out of this world fantastic....well I think I was instantly inspired by this dresser. I loved the circular detail on it, I don't know whether it's painted or papered or what, but I knew I had to try to create something like it for myself.


I found this plain dresser several months ago and it's been sitting in the garage.....finally I knew what I was going to do.


It's a great dresser, taller than average, about 50 inches. I like the simple design of it so I knew that adding the circular detail would elevate it to greatness.


The finish was not in the best condition, some gouges and scratches, but well made. A perfect candidate for extra storage.


I worked on it right in the kitchen area, took off the hardware, and laid it down on it's back.


For the circles I used 12" wreath forms called craft rings. They are made of a composite wood and can be cut and painted for any number of uses. I've used these "craft rings" (from Michael's) for numerous intended things and knew they would work perfectly for this project....the wood strips (to join the circles) are just lattice from the Home Depot that is sold by the foot.

I played around with the circles until I was happy with the configuration. I marked where I needed to cut and cut all the circles and lattice by hand. I admit it was a pain in the butt. I thought for sure that I would have to get Justin to help me, but I just marked with a pencil and used a mitre saw to cut everything. I used liquid nails and glued all the pieces down. Once the glue had dried, I filled in the holes that are on the rings with caulk to make them smooth. I also used the caulk around the rings too to make them seamless and more a part of the dresser.


I primed and painted everything white (I spared you the pictures of that :) I used Martha's Tailors Chalk left over from painting the kitchen cabinets so I didn't have to buy any paint. I toyed around with painting it a color, painting the circles a different color, and vice versa. In the end chose white. When in doubt paint it white. :) I knew it would be against the brown walls and would really pop nicely ( I use a lot of white in there). I really considered aging it out like the inspiration picture, but I'm a gloss girl. :) Don't get me wrong, I love the look of age. I like mixing high gloss and rustic, but in small doses.


I still might put some handles on, if I find the right ones. Am I they only one that can't seem to find the perfect hardware? The drawers open easily from the sides, so I don't mind waiting until the right ones come along.
I've marked a couple more things off my bedroom to-do list....I've gotten another curtain panel that I needed and the fabric has arrived to do the skirted desk. Now I've got to get it done!


I hope you're inspired!


UndertheTableandDreaming


Thursday, August 11, 2011

Changing Artwork To Suit Your Needs

I like to show you different ways of creating and displaying artwork because if you're like me, you just can't go out and buy high dollar art on a whim. A lot of what I do is based around a 'use what you have' mentality and this project is a prime example.


This project was on my left-to-do-list for the master bedroom...one down a few more to go. You remember the inspiration fabric right? I used the fabric to pull paint colors.


I had to do a little of mixing. To get the right color, I started with Canyon Orange and just kept adding red until it was close to Tiger Lily (the color of the coverlet).


So here is the piece. My MIL bought it for me years ago, back when I did a blue and brown palette. It's made from some sort of suede like fabric. It's a great piece and I didn't want to lose it just because I wasn't using blue anymore. It hangs right above one of the dressers and I have a round thingie (you'll see below) that looks great right in front of it.


BEFORE:


AFTER:


I painted out the blue and added a little grey, the rest of the colors were perfect.

So does this give you any ideas? Do you have any pieces of art you can change?

Thanks for stopping by, I hope you're inspired!

Did you miss the progress on the Master Bedroom? Click HERE


The Shabby Nest


Monday, August 8, 2011

Master Bedroom: It's Coming Along


The fabric that I ordered finally arrived and I completely love it. It was exactly what I wanted and even though it was my second choice (read about my first choice HERE) I'm so thrilled with it. I've ordered some other fabrics too, but they've yet to arrive. I didn't want to order anything else until I was sure I liked the main fabric. So a little more waiting, but I went ahead and made two pillows from my lovely new fabric.


I want to give you a little background on the master bedroom. It was the first room we painted when we moved in seven years ago....


.....and this is why. It was a terrible, terrible shade of lilac that the former homeowners had painted. I refused to do anything in the house until this room got painted. The color was just gross. I wanted to create a cozy and comfy bedroom and really flex my design muscles so I chose a dark brown. Seven years ago, I was on the "blue and brown" train (that I've since gotten off of) and wanted a dramatic wall color accented with blue. Justin and I tackled the project together. I painted the base color; Coffee Bean, Justin doesn't like to paint. To create a little interest, I thought stripes would be just the ticket. Once dry, Justin and I spent about 3.5 hours dry brushing a gold glaze over the coffee bean. The next day, Justin taped off 12 inch stripes and I came back behind him with the coffee bean and created the stripes. Good times. We worked as a team and it was one of the first projects of many to come in our new house.


Fast forward seven years, my taste have shifted, and I was ready for a change (wink, wink). So I started picking out paint colors and bringing chips home for Justin to help me decide on the new paint color. He's (usually) pretty easy going with all my decisions and supports me 100% but when I started talking about painting the bedroom room, he got stubborn! The gall! I couldn't believe he didn't want to paint the bedroom! "It's just paint!" I tell him. He's feeling a little, let's say; attached and nostalgic about "our first project" in the house. So the coffee bean is staying, I decided to play nice and compromise. :) At least it's not this purple anymore!!


So working with the brown walls, I decided to go with black, white and orange palette in addition to brown. I've been using orange in other parts of the house so it was an easy choice for me. I've been trying to pull this room together for months now and I am determined to finish it. I found a great coverlet in 'Tiger Lily' at West Elm on sale and Justin bought it and two euro shams for me for my birthday. It came in and I love how it looks. I went on the hunt for fabric to coordinate, and found a great Schumacher fabric.
After finding out I couldn't afford it, I found this alternative. It was still expensive for me, but I only needed one yard for a couple of accent pillows. It is perfect and had all the colors I needed. I did that a little backwards, I usually like to find the fabric and then the bedding, but I have had things sell out right before my eyes (online) and I didn't want to miss out on the Lexington bedding (it's not easy finding orange bedding! :).


Here it is, isn't it beautiful?


Anyway, I still have a few projects to complete, but I thought I'd show you the progress so far. I'm glad that we've decided to keep the brown, I really like how white looks on brown.


My dressers are old, just to give you an idea....my Dad bought them for me when I first moved out of the house and they were old then. They are totally vintage! ;) I am still deciding whether I want to white wash them or not, we'll see. I didn't use the mirror that was attached to the dresser, I found a big frame at the Goodwill , spray painted it white and had a piece of mirror cut for it. I used my DIY wall shelves under a couple of thrifted frames. Above that a couple of thifted decorative plates. I made myself a shell wreath for above the mirror to complete a very symmetrical look.
I wanted some symmetry over the dresser because I did a gallery wall across from the bed. Pictures of the boys and Justin.... all the frames thrifted and spray painted white. The tall dresser is a project that I am really excited about, you should see what it started from. I named it the Chain Link dresser. I'll be showing you how I did this in the days to come. You might remember the leaf art, it use to hang in the living room. I recently found that little leafy mirror and layered it right over the top of the frame, yes that was intentional. :)


A close up of the pillows and bedding. I just love the honeycomb pattern on the coverlet, it adds a lot of texture.

The lady on the dresser was my Mom's, circa 1963. She was always in my house growing up and now she'll live in mine. :) I've always loved her as a kid and thought she was so exotic looking.


I recently painted my lamps, again. This is a Krylon color called Saddle Tan. This is my first time using this color, but this color is in the fabric and also the curtains, so I tried it out. I'm liking it.


This chair and the desk behind it is on the project list... new upholstery for the chair and a new slipcover for the desk.


So here is what I have left to do:


Buy two more curtain panels


Do different slipcover for desk


Recover and paint chair


Alter some existing art (add colors of fabric)


Get rid of blue stripe around tray ceiling


What I'm still considering:


White washing the two dressers


Changing headboard


DIY Projects you can try out yourself:


DIY Sunburst Mirror


Spray Painted Lamps


Leaf Poster Artwork


Painted Chandy


Wall Shelf out of Curtain Rod Holders


Painted Black and white Dresser


Thanks so much for stopping by, I hope you're inspired!


*EDITED*
Here is the link to the fabric that I chose:
Richloom Chandler in Spice