Showing posts with label white. Show all posts

Wednesday, December 21, 2011

Blue Willow Tablescape

Can you believe that Christmas is this weekend? Time flys by so fast! This will probably be my last tablescape for Christmas, so I hope you draw lots of inspiration.


I have ALWAYS wanted to do a tablescape like this forever and and a day and finally, I decided to do it. Why not? I had the fresh greens from a party I decorated for and the faux fruit is from my arsenal of supplies.This is such a classic look and really, you can't go wrong with fresh greens and fruit and Johnson Brothers blue willow dishes. This will especially appeal to all you southern ladies. :) I wanted to use some magnolia leaves too, but my table just isn't big enough. Had I been working with my table outside, you bet your bottom I would have. The weather here has been so cold (and now rainy) indoors I had to stay


I borrowed part of my MIL's collection and mixed it with my everyday Gibson dishes. Simple glassware and contemporary flatware.


For the centerpieces, I used traditional glass hurricanes (the same that I used at the party), white candles, faux fruit, red berries and fresh mixed pines.


I don't own any blue willow, but I do appreciate the style and history of it. I really do like the oriental landscape depicted on each piece.


I didn't use any place mats, but kept on my linen table runner. It's official, you have to make one, I haven't taken it off since I did. :)


The fruit looks really real, doesn't it?


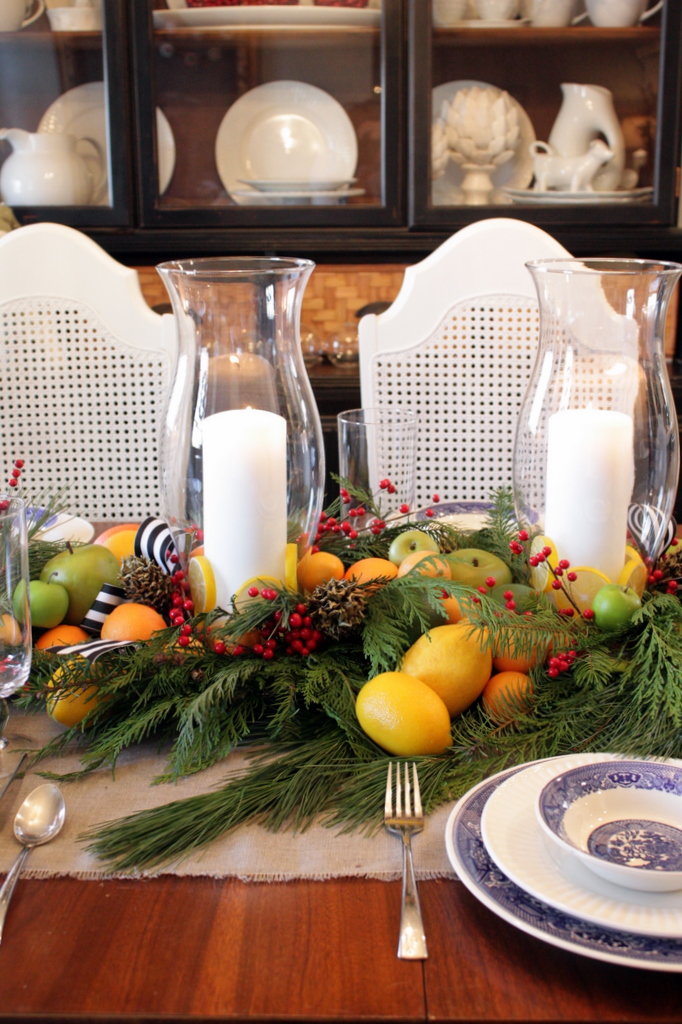
I also used the gold magnolia pods that I painted for the party too. I'm trying to come up with a clever craft to create with them.


I added some black and white striped ribbon to really keep it interesting. Plus it speaks back to the black and white in the adjacent kitchen.


I think this look would look great for a buffet table too. Can you just see loads of food all around for Christmas dinner?


Thank you so much for stopping by to see a Southern Blue Willow Tablescape. I hope you are inspired!


I will not be posting again until after Christmas....I hope each and everyone of you have a fantastic and joyous Christmas Day! I will talk to you soon.

Joining Susan


Need a design boost? For advice and guidance on style, contact me!

Monday, December 5, 2011

Christmas Kitchen 2011

I was really excited about adding some touches of Christmas to the kitchen because it's the first Christmas since the Kitchen Facelift. Since I did the facelift at the beginning of this year, this is my first Christmas with the black and white cabs. I have really, really enjoyed the changes and adding merry touches have been really fun.

We are in the throws of hot chocolate season here in MO (it's even suppose to snow today!) so I set up a 'hot chocolate' bar. Honestly, this counter is typically our 'catch-all' counter, so I cleaned it off once and for all and vow to keep it clean. What better way to keep it clutter free than to fill it with all the makings of a fine cuppa hot chocolate. The kids really love it, and really, I love it too. About 12 dollars in supplies, and everything else I had on hand.


Looking in to the living room:


On the dining table, just a simple centerpiece with cylinder vases and cedar. I raised one up on a vintage milk glass pedestal and tied some fun stripped ribbon around the glass. You might remember the linen table runner I made for my Thanksgiving table. I really love the look of it for Christmas too, I think it adds a little elegance to an otherwise whimsical look.


Little Christmas touches on the other counter too, the green (leaf green from Krylon) I use all through the year looks nice with Christmas red.


Cute little musical snowman I received last year as a gift, so cute! His little gumdrops light up too! :)


I jazzed up the chalkboard door with a wreath and a merry Santa face, handcrafted felt poinsettias and gingerbread men.
If you have ever considered doing a chalkboard door, do it, we have really loved it.


The kitchen is not super big at all, the door leads to the garage and the laundry room is in the corner past the fridge. I'm hoping to give it a little facelift of it's own next month.


The centerpiece from the Yuletide Christmas tablescape found a home on top of the hutch. I wanted a little bit of greenery and that really did the job. With the super long branches, I was able to hang some paper stars. I hope to show you how to make the stars next week.


Looking in to the kitchen.


My little collection of Waterless Snow Globes are in the window sill, behind all that sunshine. :)


I recently made over an old painting into a chalk board, check out the 'before' HERE. I hung some paper punched and bottlecap garland over the corner and added a paper star. Logan is only tall enough to draw on the bottom, it's been a fun addition.


I hope you have enjoyed the little tour. Have questions? Just ask in the comments.

Joining Layla @ The Lettered Cottage


Need a design boost? For advice and guidance on style, contact me!

Friday, August 26, 2011

The Chain Link Dresser


Thank you so much for sticking around even with my erratic postings. I am thankful for all of you who read and comment and welcome to those of you who are new. I've got some exciting things happening in my world and I can't wait to share with you. In the mean time, I'm finally getting around to sharing a dresser project for the master bedroom. I'm calling it the Chain Link Dresser.


If you remember the feature that Erin did on a beach house that is out of this world fantastic....well I think I was instantly inspired by this dresser. I loved the circular detail on it, I don't know whether it's painted or papered or what, but I knew I had to try to create something like it for myself.


I found this plain dresser several months ago and it's been sitting in the garage.....finally I knew what I was going to do.


It's a great dresser, taller than average, about 50 inches. I like the simple design of it so I knew that adding the circular detail would elevate it to greatness.


The finish was not in the best condition, some gouges and scratches, but well made. A perfect candidate for extra storage.


I worked on it right in the kitchen area, took off the hardware, and laid it down on it's back.


For the circles I used 12" wreath forms called craft rings. They are made of a composite wood and can be cut and painted for any number of uses. I've used these "craft rings" (from Michael's) for numerous intended things and knew they would work perfectly for this project....the wood strips (to join the circles) are just lattice from the Home Depot that is sold by the foot.

I played around with the circles until I was happy with the configuration. I marked where I needed to cut and cut all the circles and lattice by hand. I admit it was a pain in the butt. I thought for sure that I would have to get Justin to help me, but I just marked with a pencil and used a mitre saw to cut everything. I used liquid nails and glued all the pieces down. Once the glue had dried, I filled in the holes that are on the rings with caulk to make them smooth. I also used the caulk around the rings too to make them seamless and more a part of the dresser.


I primed and painted everything white (I spared you the pictures of that :) I used Martha's Tailors Chalk left over from painting the kitchen cabinets so I didn't have to buy any paint. I toyed around with painting it a color, painting the circles a different color, and vice versa. In the end chose white. When in doubt paint it white. :) I knew it would be against the brown walls and would really pop nicely ( I use a lot of white in there). I really considered aging it out like the inspiration picture, but I'm a gloss girl. :) Don't get me wrong, I love the look of age. I like mixing high gloss and rustic, but in small doses.


I still might put some handles on, if I find the right ones. Am I they only one that can't seem to find the perfect hardware? The drawers open easily from the sides, so I don't mind waiting until the right ones come along.
I've marked a couple more things off my bedroom to-do list....I've gotten another curtain panel that I needed and the fabric has arrived to do the skirted desk. Now I've got to get it done!


I hope you're inspired!


UndertheTableandDreaming


Monday, August 8, 2011

Master Bedroom: It's Coming Along


The fabric that I ordered finally arrived and I completely love it. It was exactly what I wanted and even though it was my second choice (read about my first choice HERE) I'm so thrilled with it. I've ordered some other fabrics too, but they've yet to arrive. I didn't want to order anything else until I was sure I liked the main fabric. So a little more waiting, but I went ahead and made two pillows from my lovely new fabric.


I want to give you a little background on the master bedroom. It was the first room we painted when we moved in seven years ago....


.....and this is why. It was a terrible, terrible shade of lilac that the former homeowners had painted. I refused to do anything in the house until this room got painted. The color was just gross. I wanted to create a cozy and comfy bedroom and really flex my design muscles so I chose a dark brown. Seven years ago, I was on the "blue and brown" train (that I've since gotten off of) and wanted a dramatic wall color accented with blue. Justin and I tackled the project together. I painted the base color; Coffee Bean, Justin doesn't like to paint. To create a little interest, I thought stripes would be just the ticket. Once dry, Justin and I spent about 3.5 hours dry brushing a gold glaze over the coffee bean. The next day, Justin taped off 12 inch stripes and I came back behind him with the coffee bean and created the stripes. Good times. We worked as a team and it was one of the first projects of many to come in our new house.


Fast forward seven years, my taste have shifted, and I was ready for a change (wink, wink). So I started picking out paint colors and bringing chips home for Justin to help me decide on the new paint color. He's (usually) pretty easy going with all my decisions and supports me 100% but when I started talking about painting the bedroom room, he got stubborn! The gall! I couldn't believe he didn't want to paint the bedroom! "It's just paint!" I tell him. He's feeling a little, let's say; attached and nostalgic about "our first project" in the house. So the coffee bean is staying, I decided to play nice and compromise. :) At least it's not this purple anymore!!


So working with the brown walls, I decided to go with black, white and orange palette in addition to brown. I've been using orange in other parts of the house so it was an easy choice for me. I've been trying to pull this room together for months now and I am determined to finish it. I found a great coverlet in 'Tiger Lily' at West Elm on sale and Justin bought it and two euro shams for me for my birthday. It came in and I love how it looks. I went on the hunt for fabric to coordinate, and found a great Schumacher fabric.
After finding out I couldn't afford it, I found this alternative. It was still expensive for me, but I only needed one yard for a couple of accent pillows. It is perfect and had all the colors I needed. I did that a little backwards, I usually like to find the fabric and then the bedding, but I have had things sell out right before my eyes (online) and I didn't want to miss out on the Lexington bedding (it's not easy finding orange bedding! :).


Here it is, isn't it beautiful?


Anyway, I still have a few projects to complete, but I thought I'd show you the progress so far. I'm glad that we've decided to keep the brown, I really like how white looks on brown.


My dressers are old, just to give you an idea....my Dad bought them for me when I first moved out of the house and they were old then. They are totally vintage! ;) I am still deciding whether I want to white wash them or not, we'll see. I didn't use the mirror that was attached to the dresser, I found a big frame at the Goodwill , spray painted it white and had a piece of mirror cut for it. I used my DIY wall shelves under a couple of thrifted frames. Above that a couple of thifted decorative plates. I made myself a shell wreath for above the mirror to complete a very symmetrical look.
I wanted some symmetry over the dresser because I did a gallery wall across from the bed. Pictures of the boys and Justin.... all the frames thrifted and spray painted white. The tall dresser is a project that I am really excited about, you should see what it started from. I named it the Chain Link dresser. I'll be showing you how I did this in the days to come. You might remember the leaf art, it use to hang in the living room. I recently found that little leafy mirror and layered it right over the top of the frame, yes that was intentional. :)


A close up of the pillows and bedding. I just love the honeycomb pattern on the coverlet, it adds a lot of texture.

The lady on the dresser was my Mom's, circa 1963. She was always in my house growing up and now she'll live in mine. :) I've always loved her as a kid and thought she was so exotic looking.


I recently painted my lamps, again. This is a Krylon color called Saddle Tan. This is my first time using this color, but this color is in the fabric and also the curtains, so I tried it out. I'm liking it.


This chair and the desk behind it is on the project list... new upholstery for the chair and a new slipcover for the desk.


So here is what I have left to do:


Buy two more curtain panels


Do different slipcover for desk


Recover and paint chair


Alter some existing art (add colors of fabric)


Get rid of blue stripe around tray ceiling


What I'm still considering:


White washing the two dressers


Changing headboard


DIY Projects you can try out yourself:


DIY Sunburst Mirror


Spray Painted Lamps


Leaf Poster Artwork


Painted Chandy


Wall Shelf out of Curtain Rod Holders


Painted Black and white Dresser


Thanks so much for stopping by, I hope you're inspired!


*EDITED*
Here is the link to the fabric that I chose:
Richloom Chandler in Spice