Showing posts with label chalkboard paint. Show all posts

Friday, August 9, 2013

A couple of Trays...


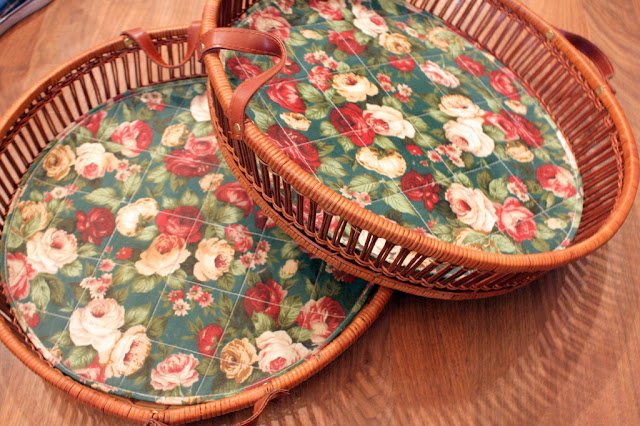
 I was out and about the other day and found these dated, yet useful looking trays. I thought with a little bit of work, I could sell them in my booth.


 They've got nice handles, quite sizable, but came with a...I'm guessing 90's...quilted fabric lining.

 Once I decided to update the fabric, I realized that the wooden bottom would take chalkboard paint very well. With a small brush I carefully went around the edge...
 ...then rolled in the rest of the bottom
 For the "new" fabric, I used a couple of napkins that I've had for a while from Target.
 I used the lining as a pattern and cut the napkin. I sewed the new fabric to the old lining (I don't trust my sewing skills to make a completely new lining), threw them in the wash hoping to make it look like a rag quilt (after snipping all the way around).
 It didn't quite fray like I wanted, but I think a couple more washing will do the trick.
While I had the chalkboard paint out, I painted an old vase and let Logan draw whatever he wanted on it. Are you like me, once the chalkboard paint is out, you're on the hunt to see what all can be painted like a mad dog?
 He drew every family member, which I thought was really cute.
 So with or without the lining, I think they are definitely updated. I could see them hung on the wall with the dinner menu too! A twofer!


***

 I'm suppose to be going back to Houston for 3 days next week to start the trial. I am excited, but really upset that it happens to fall on the same day school starts. So I won't see my baby's first day of second grade or watch Keegan drive off to start his Junior year. No pictures or hugs which I insist on every year. Even last year, even though I had chemo, at least we got pictures. Is that dumb that I'm bummed about this? Probably. I'm to start a drug that could potentially save my life, but I will miss the kids first day of school....I know, I'm a nut case.
 I'll let you know how it goes when I get back. Talk to you later.
2011-12-013

Tuesday, July 31, 2012

Logan's Room: Vintage Camp


If your children are anything like mine, they are 'into' everything. Dinosaurs, cars, Thomas, and a whole host of other toys and characters. So picking a theme isn't always easy. You want it to be fun and functional, with plenty of storage, a place they can call their own without going overboard. If I had to call this current look anything, maybe a loose camp feel?
I've been working in Logan's room trying to get things more organized and editing clothes and toys before school starts next month!! Wow! Where did the summer go???


Logan's room has always been vintage based and when he was super young I had picked out 'Lil' Cowpoke' fabric as an accent. Now that he is older, a little more mature look is in order.
This is a dresser my in laws gave me. I was thinking of painting it, I even feel a little silly showing you, but I didn't do anything to it except polish it! Once it got in here, the light pickled look was great and even seemed to be the same shade as the burlap pennant garland...so it made no changes whatsoever. Shocker.
Two vintage lamps that I picked up (new shades from Lowe's), they add a lot of light and height. I did a collage over the dresser consisting of things I've collected over time, all vintage except for the black frames. I put some of Logan's blocks in the old print block tray, old license plate, a watercolor from the flea market, matted and framed. I made his name banner a while back, it use to hang over the window, but I decided to try it over the collage for some layering. Not traditional kid's art, but I love the mix and there is growing room...I'm sure I'll pick up other things along the way.
We moved Logan into a twin bed (from a race car bed), especially after I found a twin head board and foot board. Literal curbside find. I couldn't believe it. The wood was pretty dried out and washed out and I decided to freshen it up with paint. I kept the linens pretty neutral, i.e. no character bedding. Mostly navy and orange. Vintage camp blanket (you've seen that blanket used in tablescapes :) Navy comforter from Walmart, ticking pillow I made a long time ago, striped pillowcase and euro sham from West Elm.
Here is the before of the spindle bed:
And after three cans of black spray paint:
  I ordered this rug from Overstock and I absolutely love it.
It is described on the website as being southwest, but I think it looks like camp/vintage. I really love how it picks up all the colors in the map wall
I found this orange metal chandy at a flea market in Bella Vista, Arkansas a couple of years ago. It's got to be from the 70's....Justin put it up for me a while ago. It looks pretty campy doesn't it? :)

The only thing I'm waiting on is this fabric from fabric.com, as soon as it comes in, I'll be making curtain panels. I would  also like to find a small round side table to use as a nightstand, something wooden.


Other than that, I think we are pretty close to to done!


Monday, November 7, 2011

DIY Chalkboard Project

I hope everyone had a fantastic weekend! The weather has been so {mild} nice for this time of year, I was able to hit a few yard sale and estate sales, if you can believe it. The season hasn't ended yet! :)


I love being in a family that brings me stuff to 'makeover', is your family like that? "Oh Michelle can do something with that..." is what I hear a lot. So when my FIL brought me a ginormus fake oil painting, I knew exactly what I wanted to do.


Here is the 'before'. Can you tell just how big this baby is? It's 32" X 56", it's a biggin'. I think that it once hung in a restaurant. if I'm not mistaken. It's got some nice things happening for it....nice frame, fabric covered fillet, and the sheer size of it.


I took the faux oil painting out and rolled on a coat of chalkboard paint. While that was drying I scrubbed the frame with warm soapy water and painted the fillet. It had several stains (it's fabric) and a little dingy looking, so I used craft paint and painted right over it.


This is how well it turned out, looks good as new.


After a couple of more coats of chalkboard paint, and an over night dry-time, it was ready to reassemble and hang. I did change the direction of the wire to portrait style vs. landscape. Aside from cleaning, I did nothing else to the frame, I love it when that happens!


I hung it on this little small wall we have by the back door and hung it low enough that Logan can have his fun with it too.


As you probably know, you should always 'season' the board before using, which I did and wrote a little seasonally appropriate quote.


I hung my maple leaf garland across the top, just for fun. I broke took off a couple of leaves so it wasn't too long. If you would like to see how to make this Maple Leaf Garland yourself, click HERE. It's a fun project too.


Thanks so much for stopping by! I hope you're inspired to make yourself a chalkboard!


YourSiteTitle


Need a design boost? For advice and guidance on style, contact me!

Wednesday, October 5, 2011

Halloween Scenery

Last year, I totally waited until the last minute to decorate for Halloween, but this year, I've gotten a head start. We have such a large turnout of trick-or-treaters, that we usually go all out. Not in a scary way, just a fun and festive way.


I always try to do something different each year just to keep the same ole stuff looking fresh. Now what I've done this year, you will either think I'm a genius or think I'm a nut. Last year, I painted the door black, check it out HERE. Well, what I didn't mention was the fact that I used chalk board paint. At the time, I did it because after using two other types of black paint and going insane over the roller marks, I tried chalk board paint and it did the trick. Fast forward to today, and it dawns on me that I could have a little fun with this!
I basically just outlined the panels with chalk, but it made it look sort of cartoon like and very Halloweenish!


I also went a little crazy on my fall wreath too. I changed out the plaid bow that I had on it for fall (which I'll put back on after the 31st) in lieu of a Halloween bow. I used three different ribbons and left the exaggerated tails extra long. I added a little wooden Halloween garland that I got at Barnyard Days last weekend.


My little flower bed is over flowing with mums. Some of them are four years old, and they come back strong every year. I missed out on cutting them back this past spring because I was recovering from my surgery, so they are bigger than I like for them to get. I didn't have the heart to cut them back once they were all full of buds, so as a result I have giant mums! :) They haven't all bloomed yet, but it won't be long.


Huge mum bushes didn't stop me from planting a few new things this year, kale and pansies, and a perennial that I can't remember the name of.


I put out a couple of skeletons and tombstones out in the beds, I think they look kinda funny.


I also planted a new color this year too, this burnt orange color will mix well with the yellow and red mums.


The new mums helped in hiding how leggy the older mums had gotten too.


I don't have a huge entry, but on the left side, I've hung an old crib spring and then layered little fall goodies, stuff I've had for years.


Another look at the wreath, I found that ribbon at Michael's last year, but they didn't have anything that cute this year.


I still have lights and spiderwebs to add, but we are getting there!!


Thanks for stopping by! I hope your are inspired!
Visit thecsiproject.com

Joining Sarah


Need a design boost? For advice and guidance on style, contact me!