Wednesday, June 22, 2011

I've Been Drinking Heavily...


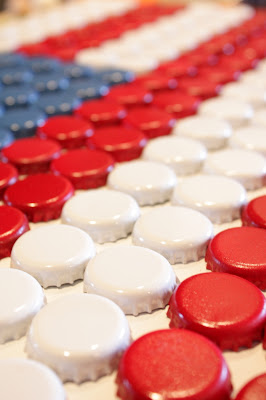
Did that title get your attention!?! :) he he he! Sorry, I just couldn't resist! I haven't really been drinking, but I have {still} been collecting bottle caps and came up with another project just in time for the 4Th of July. If you'd like to see my other bottle cap creation, a bottle cap tray, click HERE.


Now this was my first time doing this so in retrospect there are a couple of things I would do differently, which I'll list later. Over all, I think it turned out cute. I wanted to hang this on the front door instead of a wreath, but I will have to bring it indoors should the weather get bad. It is not weather resistant.


Here's what you'll need:

Bottle caps

Scrap piece of board, I used MDF

Krylon spray paint

(Global Blue, Cherry Red, and Glossy White)

Glue gun

2 Eye screws

Patriotic ribbon

Wired Star Garland

Chipboard letters (USA)


Now I will not lie, this was one tedious project. The gluing of the caps seemed never ending...but if you can persevere, it'll be worth it. I was going to hire it out, but my teenager wanted too much money, so I went ahead and did it myself. :)


The number of bottle caps will be determined by the size of the board you're using. I used over 200 {gasp} and the size of mine is about 13 X 19. Odd I know, but it was a scrap after all.


First of all, determine your number of caps by laying them out on your board, sort of a dry fit, so to speak. Determine which will be painted blue, red and white, and separate them, I just eyeballed it. Spray prime them and let them dry, I used cardboard to paint them on and labeled each one the appropriate color so I wouldn't get mixed up...


After the primer has dried, spray on the 3 colors. I used Krylon paints because it dries really fast and you can quickly do 2 or 3 coats. However, I didn't do this all in one day, I let the primer dry over night, and then the final coat of paint over night. I also painted the board white. Now the gluing begins, make sure you have plenty of glue sticks handy, two squeezes of the trigger gets just the right amount of glue per cap.


Keep gluing and gluing and gluing.....
until you've turned old and grey covered your board.


I wanted to use ribbon as the hanger so I measured in about four inches and used an eye screw on each side of the top to tie the ribbon on.


Attach the ribbon of your choice, I had this flag ribbon on hand, but I saw some cute ribbon at Michael's when I was buying the wired star garland. I made a bow with the star garland and attached it around the eye screw and then tied a small bow with the flag ribbon and wired it on too, leaving some nice long tails.


I used some silver letter stickers and put USA on the lower right hand corner, just in case it wasn't patriotic enough. :)


It is ready to hang on the front door! It looks really festive when you're walking up the walk.


Ok, in retrospect, I think I would rather have the "stripes" in single rows.... a single row of red and white vs. double like I have it. It wasn't until I hung it up did I notice that it would have looked better that way, sometimes I forget to step back from a project. I might change it, but then again, I might be being a little too anal.
Secondly, I should have painted the board black and then the caps would have seemed to be floating, which would have been way cooler, oh well.


All in all, I love how it turned out and it is totally original.


I hope you are inspired to keep collecting bottle caps and put them to use! Thanks for stopping by!


Visit thecsiproject.com


Tuesday, June 21, 2011

Tuesday {Ten}

I always like when people have great ideas and Tuesday {Ten} is just such an idea. Stephanie Lynn came up with a link party that celebrates the randomness that everyday life brings around that just isn't worth an entire post, but is worthy just the same. Over time, I have come to realize that I don't do short, quick, or multiple post per day, if you are that type of author, that's great, but I am too snap happy and long winded to just post a single picture and click publish. So having a post of arbitrary, random and non-related pictures will certainly be a new experience, but one that I hope we'll enjoy! :) So here's a glimpse into random Michelle world...


#1) Ahh yes, the eat in kitchen that I treat like a dining room.....new artwork, found at Walmart of all places, and at a practical sale price of $5 each. I love botanicals, don't you, especially at five dollars?


#2) A trip to the Goodwill reaped some fun finds, a good day for woods. All of the finishes will stay the same, save the brass sconces. I am thinking of spray painting them, shocking I know, but I haven't decided yet.


I found some nice frames with matting, these will definately be painted and the art changed. Anyone need a picture of the White House at night?


I found this chandy too, oh yeah, I plan on painting it to look a bit more like a lantern and hopefully it will make it into the master bedroom design.


#3) I finished a fun patriotic project just yesterday that you've just got to see, I can't wait to show you. Tomorrow.


#4) On Father's Day we went out to eat and afterwards stopped off at a park to snap a few pictures. I won't share all of them, but I couldn't resist showing this one of Logan.....


....and this one of both my boys.


#5) I didn't blog about it, but we lost our Rotweiler of ten years last summer. I did a charcoal of her as a gift for my husband (she was really his dog). We really miss her, she was such a good dog.


#5) I was honored to be included in a wonderful group of talented people featuring Handmade Ornaments on HGTV.com. To see 12 handmade ornaments, click HERE.


#6) Summer in Missouri afford me pictures like this:


#7) But I really miss the beach. :)


#8) Logan started T-ball this year, he is growing up so fast. It is so cute watching a team of five year olds grasp the concept of baseball, it is so adorable!


#9) I get several emails about how I do my blog headers with pictures. I use THIS great tutorial and it's really fun and easy, I do a lot of them (in case you haven't noticed:)!


#10) I was super excited to recently do some florals for a local business. I've done some big ones before, but these are some of the biggest arrangements that I have ever done. Don't let the pictures fool you, two of these were over 40" tall! If you would care to see the other arrangements take a look HERE.


Bonus #11) Sorry, I just had to include these great finds. I found these tea jars at Hobby Lobby. I rarely find, if ever, accessories I like (that I don't have to paint) at HL, but these are just beautiful to me.


Thank you so much for stopping by! I've enjoyed sharing tidbits of our life. Be sure to drop by tomorrow to see a fun 4th project.


UndertheTableandDreaming


Thursday, June 16, 2011

America The Beautiful Tablescape


It all started with red buffalo check fabric. It wasn't that I wanted to sew anymore (I've been on some kind of sewing kick lately), I was really hoping to find a nice red check tablecloth, never did. So I started looking at fabric...most checks that I found were rink-a-dink, one inch or smaller, I wasn't going to give up, I wanted big buffalo check! Finally, I found what I was looking for...big three inch check in "lipstick red". It took no time at all to hem the edges and I had a tablecloth for the fourth, well, for the summer season really.
I like having hurricanes as part of the centerpiece, this time I put my cylinder vases on milk glass pedestal bowls. I snipped boxwood from the front yard and filled in around the base. The little flags put a patriotic spin on a simple look. You'll rarely see me use anything but white candles, white goes with everything, even in wax. :)

My sidekick, popped up just at the right moment:


Do you remember the coke crate flag that I made last year? It was inspired by a fresh version that one of the Pottery Barn designers did. My interpretation is smaller and using silks, you can see how to make it by clicking here.


I love how it looks and is certainly low enought to talk over.

I don't have any napkins or napkin rings that are specifically for the fourth, so I mixed and matched what I did have. Red herringbone napkins are usually for Christmas, they work well enough!


I also used a muted watermelon red too, it's got a great summer floral motif and I love the faded look (it looks well with the faded coke crate). The blue dessert plates and white dinner plates are the only thing consistant with each place setting, but I like the mix. The red napkin rings are another holiday item I bought during Christmas, it doesn't hurt to think ahead, although I wish I had bought more, they are nice and heavy and have a flat bottom so they sit real pretty, oh well.

A full shot of one of the hurricanes, the boxwood is such a great green.

My outdoor table sits 8-10, that is if I had any chairs. I have yet to find any second hand chairs that I like (I been on the hunt since this time last year), so my plan is to have Justin build me two benches intead, we've got the wood so hopefully this weekend I can sweet talk him into building me some. I don't know though, it is his birthday and Father's day weekend. I wonder if I can turn this project around and make him think it's for him, I'll have to work on that.


The cobalt blue goblets are super cheap and from Wal-mart, and the utensils are from Target, don't you just love how retro they seem?


I used my flag banner in the backdrop, if you'd like to create one for yourself, click here.

Oh, and I forgot to tell you that I used a full size coverlet under the tablecloth, I was so excited about the buffalo check, I forgot to mention it! I've used it often, and it fits perfect on the table.

Thank you for stopping by! I hope I have inspired you for an outdoor party for the fourth!


Hope you are having a great Summer, I am getting better and better everyday! I had a doctors appointment yesterday and everything is looking good.

Trying to keep up with this guy helps!


Do you like my edits? I love playing around on Picnik!


Would you like to view more photos and details of this tablescape? Take a look at my photostream by clicking here.


I am working on a patriotic project that I hope to have finished up by the weekend, I hope you'll check back.


Joining Susan

UndertheTableandDreaming