
I found this baby at the Goodwill for a steal....great piece, just not in my favorite finish. I looked past the shiny brass and knew it was the shape and size I was looking for.

I wanted something big, dramatic, and lantern-ish. It's definitely big, 30" long by 17" wide. This would not have worked had it not been for the tray ceiling in the bedroom.

On to painting. There are a lot of different ways to use spray paint and here is what I find works best for me. I always, always, always prime, especially metal. I use clean metal primer and it covers like a dream. I like to leave it over night to really cure, by the next day, the surface is ready to accept paint. For spray paint, I typically use Krylon, in this case I used glossy black. I find that I use less paint when I prime, not to mention a much more durable finish. Again, I like to let the paint cure another night. After lots and lots of spray painting projects, this is what works for me.

I chose to mask off the glass instead of taking it out. I was afraid I wasn't going to get the chandy put back together right, so I masked. Here is a tip: Once I had unscrewed the little triangle screw caps and taken out the lighting part, I screwed them back on. Not only does this make it easier to prime and paint, it protected the threads from getting sprayed.
Goodbye brass, hello black! I primed, I painted, I happy! :)
My guys hanging the chandy, don't they look so happy about doing it! Ha! I don't remember what they were talking about, but I'm sure it wasn't about being happy hanging this heavy thing!

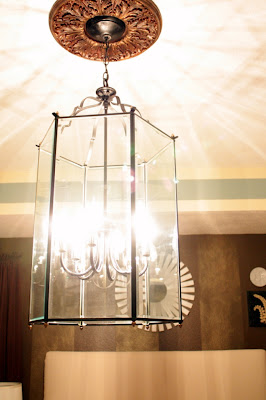
It works! I had this vague fear that after all the work I put in it (and the work in hanging it) that it was at the Goodwill because it didn't work. Luckily, that fear was unproven! Shew!

I cleaned it all up and it looks fantastic in the room. One other step that I did, which was hard to photograph. I used Rub-N-Buff (in antique gold) on the little triangle screw caps. It was really a great detail that talked back to the other gold in the room.
You might ask yourself why didn't I just leave them the original brass, well I wanted them to be antique gold and wanted some of the black showing through. It's really a detail that isn't noticed right away, but I think it helped it stand apart from just a standard black paint job.
I think it was worth all the effort!

If you've got one, I hope you are inspired to paint that brassy chandy!

The bedroom is coming along, I can't wait to show you everything that's been done, and see how far it's come (and see what will still need to be done :)! Here's a little sneaky peaky!


WOW! I am amazed! Thanks for the great post, helps me so much w/my minds eye!
ReplyDeleteGreat light fixture, Michelle! What a find! I love it! I saw something similar at the Restore a few months ago, and while I did think about it, I passed because I know we will be moving soon. Next house!
ReplyDeleteThis turned out great! I love it!
ReplyDeleteThe chandelier turned out beautifully! Love the little gold touch. Can't wait to see the rest of your room.
ReplyDeleteI would have probably passed on the lamp...the shiny brass would have temporarily blinded me. Believe you me...I'll be looking for something similiar in the future. It looks amazing. Who'd a thunk it?
ReplyDeleteDebbie
P.S. You may already know this, but a little trick I do is to take an extension cord that the female end has been cut off of and attach it to the wiring of a lamp. I then can plug it in to see if it needs rewiring before going too far into the project.
Debbie, thanks for the tip, I forgot about that!
ReplyDeleteWow its great!
ReplyDeleteI can't believe how beautiful it looks. I can't get over what a good job you did! Love love love it! Thanks for the ideas.
ReplyDeletelooks great, i told my husband i wantd to spray a few of ours and he thought i was nutz... i have to bring him to blogsville!
ReplyDeleteHow great is that? It looks entirely different and perfect. I love it!
ReplyDeleteHi Michelle,
ReplyDeleteThe light fixture came out fabulous! Thanks for commenting on my blog. Love your blog. I'm your newest follower!
Jean