Showing posts with label painted furniture. Show all posts

Monday, May 6, 2013

Embrace Color With Furniture Pieces

If you've been reading for even just a little while, you know that I have a booth space. It's not huge, but when I see a piece of furniture I snatch it up...just like this table. I have to love it, of course, and usually want it for myself, but that's the trick you see...you can't save the good stuff for yourself. :)
It seems like every time I paint a piece a bold color, it sells....so I just follow my heart, listen to my gut and let the piece tell me what color it wants to be. This can be hard sometimes..."Will it sell?", "What if no one likes that color", "What will people think?"...these are the questions that ALWAYS surface when I see a piece of furniture that I'm considering for my booth.
But I try to smoosh the fear, wipe off the bottom of my shoe and go for it. I'm not saying it's easy, but just like the Artist, the biggest fear is a white canvas...you just gotta do it-just start. That's what Mrs. Hile taught me in college anyway.


So this is how this little piece started. Gorgeous legs, fantastic shape is what you see, but in addition....damaged top, some gouges, and extremely dry wood-just begging for a nice layer of paint....it's the body lotion for wood ;)

Love the turned detail and cross members.

When I'm busy listening to the piece, I'm also thinking about the method of painting. I'm not a member of any particular camp, I spray, I hand paint, I use foam rollers, brushes...I'm like Switzerland. Neutral.
Whatever gets the job done.
When a piece is small and has lots of turned details like this table, spray painting is usually what I decide on. It just makes my life easier and really, can you imagine hand painting those legs?


I chose Blue Ocean Spray from Krylon for the color, I can't even count how many times I've used this color. It's right up there with Ivy leaf and they look great together too. I probably used three cans of paint in total.
I contemplated leaving it nice and smooth, but because of the obvious age of the piece, it seemed like some distressing was in order. Plus, I think it makes people feel like they can live with a piece a little better when they're not stressed with a "perfect finish"...although I haven't always distressed-see? Neutral.
I did not do any repairing on the top either-I embraced the imperfections and that is okay.
150 grit sandpaper used for distressing the edges and legs.
To knock the color down and stain the exposed wood (caused by the sanding), I used dark stain, just like the little green dresser.
Can I say how much I love this color? Go embrace your favorite color!
It's going to be hard to let this one go, but down to the booth she goes.
I am getting chemo today, then my trip, so I will not talk to you for a while. Thanks for being here anyway.

2011-12-013

Friday, May 3, 2013

The Little Green Dresser (A Before and After)

I didn't think we'd be talking again before my trip! However, I wanted to get a couple of furniture pieces done for my booth space before I left, and I am really excited about this little transformation.

I found this sad, poor little dresser and thought it needed me. ;) It's not an heirloom piece, just simple construction and lines and fairly small. It said "kids room" to me for sure. The finish was in horrible condition, so I basically just had to decide what color I wanted to paint it.
The top of the dresser was even worse...
You might be surprised, but I spray painted this piece (except for the top)! I used Ivy Leaf from Krylon, which is one of my all time favorite colors.
With 150 grit sandpaper, I distressed the edges of the body and drawers.
Using Citrus Stripper, I stripped the top and re-stained it. Can you believe the renewal of the top, I was SO happy.
I also used the stain over the whole piece to knock down the brightness and stain the exposed wood. Finally, I did a coat of poly just to seal everything up.
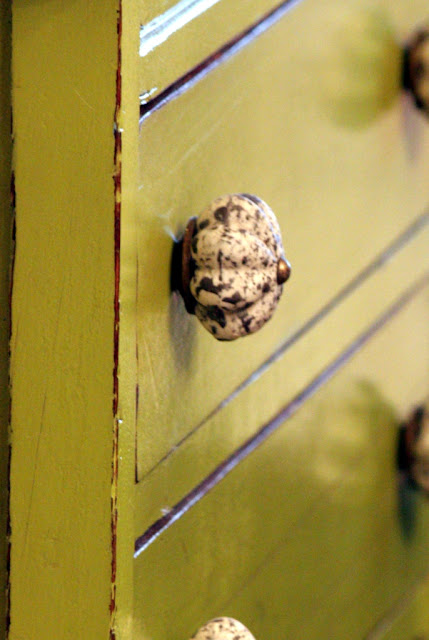
Do you like the new knobs??? I wanted to pump up the look of this piece even more and made a beeline to Hobby Lobby to check out knobs. I found these speckled ceramic knobs and stopped looking, I think they really make the dresser! Don't they look like bird eggs (or is that just me)?
So off to the booth she goes, and hopefully to a good home.

Joining Miss Mustard Seed


2011-12-013

Thursday, February 7, 2013

Little Black Dresser

 Now, I can imagine that if you read blogs long enough, that a simple paint job transforming an old piece of furniture is, frankly, getting old (so I hope you find this interesting). But for me, I never tire of spying a piece of furniture in it's current run-down form and imagine what it could be. Deciding what approach to take, what color, what sheen, should I replace the hardware? Questions and decisions circle feverishly in my head until I decide.


 Sometimes it's a quick process, sometimes it's slow, but above all, I let the piece tell me what to do.This dresser clearly has good form, nice lines and in fairly good condition. Since the finish is outdated and the top is covered in cigarette burns, I ultimately decided on paint.
 Because of it's fantastic shape, it really said regency to me...which in turn calls for a classic color, so I settled on black. Again, just your normal paint job with black I had on hand and a thin layer of polyurethane for some added shine.
 For the handles, I considered replacing them, but why? They are certainly in scale with the dresser....I just had to come up with a technique to make them stand out.
 First, I painted them black and let them dry. Next, I used a painter's brush (one of my gnarly ones) and Rub-N-Buff  to get a gold tone over the black.
 It was just what it needed. A good solid color, a lot of shine and a little glam.
This one almost stayed home with me but alas, it's available for sale in my booth. Sigh.
I'll be showing you some more of my booth in the coming days and show you how I've incorporated the color of the year: Emerald. Talk to you soon!

***
Thank you for commenting on my return to blogging. I had chemo on Monday with the new regimen. I have been down and out for several days so much so my dear MIL had to keep Logan for me....I just couldn't move. That's to be expected I suppose since it's a new drug and my body has to get use to it.  Luckily, no vomiting, knock on wood. Knock.Knock.Knock.

2011-12-013

Monday, March 26, 2012

Hand Painted Coffee Table


Well, before we get to the coffee table, I have to show you these two chairs that I recently scored. No, they are not matching (which is ok) and now I am faced with the decision a.) whether to paint or not and b.) fabric choices. Even more thoughts....fabric paint for the one on the left and I wonder what a bleach and water mixture would do to the one on the right.....although I really don't mind the navy fabric on it and it's in excellent condition...who knows what I'll do....any way you are here to see a painted coffee table right?


We have had this coffee table since before we got married (yikes!) and it was used then...the stamped date underneath is circa 1983....needless to say, she's not a precious antique...so through all these years of abuse from a house of boys....her age was beginning to show.


But the shape is fantastic, I've always adored the legs, but you can really see how bad the top is in this first picture...
chips, dents, dings, water marks...you know the story...
boys.


Keegan hauled it outside for me and set it up on my 'painting pallet'. I sprayed the entire piece glossy black. It is not a great departure from the dark walnut, but really cleaned up the finish


Once the table was completely dry, I broke out the gold leaf pen and hand painted some leaves around the perimeter. Gold leaf pens are really great to work with, great control, so I was able to finish the design in under 30 minutes.


I worked 'backwards' so I wouldn't smudge my work, although it dries fairly quickly.


The pattern added just enough to the top of the table to keep it from being just another piece of black furniture. I also added gold to the 'knuckles' (for lack of better word) of the legs...you'll see a better picture below, again bringing a little more detail in.


Once the the gold leaf was nice and dry, I put on a coat of poly and let it cure a couple of days.


Better picture of the legs:


I moved it back into her regular spot in front of the sofa.....


...we'll see how many more years we can get out of her!


I styled her up pretty neutral (there is a lot of color going on in the living room as it is!) but I love the air of formality she's got now.


Now what to do with those chairs.......:)


Friday, September 2, 2011

The Blue Dresser and Wreaths!

Opening day was yesterday at Rangeline Antique Mall! Thank you for all the wonderful comments and support in my new adventure! I wanted to get down there early in the day and hang some wreaths but our AC decided to quit so I had to stick around the house til the AC guy came out. It's not been one of my good days to say the least...I've been hot and frustrated all.day.long. Luckily, around five, I was able to run three new wreaths out to the booth (you'll see them below) and I wanted to start showing you some B&A's of some of the furniture pieces I used.


When I decided to do the booth, I had a pretty good idea what was in storage and this dresser is what I wanted for the focal point. It is the dresser that I had growing up, but it didn't always look like this....it didn't even look as good as the 'before'. I don't remember all the details, we were living in Williamsburg at the time and my parents bought this dresser, mirror and a matching desk for my room. It was second hand and the former owners had stripped the furniture and then I guess decided to bail on the project and sell it. To make a long story short, I lived with the 'stripped' furniture look (not the good kind) my whole childhood. My parents weren't much on DIY. :)


However, Mom finally decided to paint it.....I think I was 32. :) This is the 'before', she painted it a cream color and left the handles original.


It wasn't a bad choice and she did a nice job but I wanted to do a little something different. Now, like I said, I had a plan for the booth....I wanted a black and white trellis pattern wall and a blue dresser to sit in front of it, so that's how I decided on what color to go with. I knew I didn't want the mirror matching, but I didn't decide on the finish for that until later.


I painted the handles with clean metal primer and a couple of coats of glossy white from Krylon. I think they turned out great, they were so dingy before.


The blue is called Schooner Blue from Olympic paint at Lowe's. I had a quart mixed in a gloss enamel and had some left over. This piece ended up being my MIL's baby, she painted the whole thing and didn't even complain (out loud :) about the sanding in between coats I forced her to do! She did a great job!


She gave it a coat of furniture wax and this dresser turned out beautifully! So while I think it will take a special customer to buy it, the booth would have been dull without it. I love how the amber lamps look on that blue!


I also wanted to show you a couple of wreaths I made. I'm trying a new size this year; the finished size on this is about 24". I personally like them a little bigger, but the smaller sizes sell better for me. I didn't use any ribbon on it either, I wanted to see how that will go over too. I hope to get some more made as well.
I have not listed this on Etsy, it is hanging at the booth now. If you think you would like it and need it shipped, just let me know. We can work that out.
( I can't wait for Fall!)


Then I made a eucalyptus wreath, old school I know, but I love eucalyptus and it makes such a beautiful wreath. This one will need a little more TLC than the silk wreaths but I think it's totally worth it and good smelling too! This finished size is 30", again if you're interested, email me.

Now don't smack me. Yes, it's a sheet music wreath. I was shopping around, you know, like I do... and I found an old music book. I just had to make one for my booth. I felt obligated to introduce them to Southwest Missouri! :) For the record this was part of my frustration today.... ninety+ degree heat and making little paper funnels don't mix for me....it took me forever to do this wreath! I hung it on the mirror at the booth....I'll let you know if it sells. I don't think this would be able to ship (it's too delicate, I think), sorry!


Thank you for stopping by, I hope you're inspired!!