Monday, September 12, 2011

One Year of Mantlescapes

I was stripping the mantle of it's summer accoutrement (so sad!!) to get ready to do a new mantlescape and it dawned on me that it has been a full year since we did the Fireplace Facelift! So I thought it would be fun to visit all the mantelscapes that I've done over the past 4 seasons. Are you game?

The mantle is one of the only places I have to do any foo-fooing in the living room, so it gets lots of attention, and it's one of my favorite things to do (you know this right?:)

So a refresher of where the fireplace began in our suburbanite home. FYI: Click on the links below each picture to take you to the original post for all the deets.

Yikes! Talk about a flashback! This was taken right before we moved in 2004 (we painted everywhere before we moved in). I lived with this wimpy mantel for several years, then finally we tackled it last summer.

The Fireplace Facelift


( What it looks like, as of today, 2011)


Summer Mantle, 2010

Fall Mantle, 2010


Halloween Mantel, 2010

Christmas Mantle, 2010


Pre-Spring Mantle, 2011

Spring Mantle, 2011
Summer Mantle, 2011

2nd Version, Summer Mantle, 2011

Sadly, Summer is over.....but I am working on a new mantlescape for fall, I'll be sharing soon!

Thanks for stopping by! I hope you're inspired!

So, I gotta ask: Have you been bitten by the 'fall' bug yet?


Friday, September 9, 2011

The Skirted Desk


I hope your week is going well, today, I am back in the master bedroom, sharing my version of a skirted table. In my case a skirted desk. I've been wanting to do something like this for a while. I think it adds a lot of visual weight and personality to what might be an otherwise plain piece of furniture and you can pick some great fabric too.


However, I'm not really sure if I should be giving any kind of instruction pertaining to a sewing project, you know how bad I am with sewing, so just keep that in mind. I am an amateur sewer.

I searched and searched but I just couldn't find a tutorial that I could wrap my mind around. So I just kinda stared at the desk for a while thinking and trying to figure out how I could do a fairly simple slipcover and not go insane. And because it worked out, I thought that you might want to try it this way too.


I ordered fabric and it arrived pretty quick......but just sat there until today. I hope you remember this desk, I gave it a paint job and chalkboard top last year. It use to reside in the kitchen, but after the facelift, I moved it into the bedroom and I liked it so it stayed. What wasn't working anymore was the paint job. Since I had been admiring skirted tables for some time, I didn't see why I couldn't try making a skirt for the desk.


Since every one's desk, console, or table will be different, I'll spare the measurements, but I bought three yards of THIS striped fabric and I had a little left over.
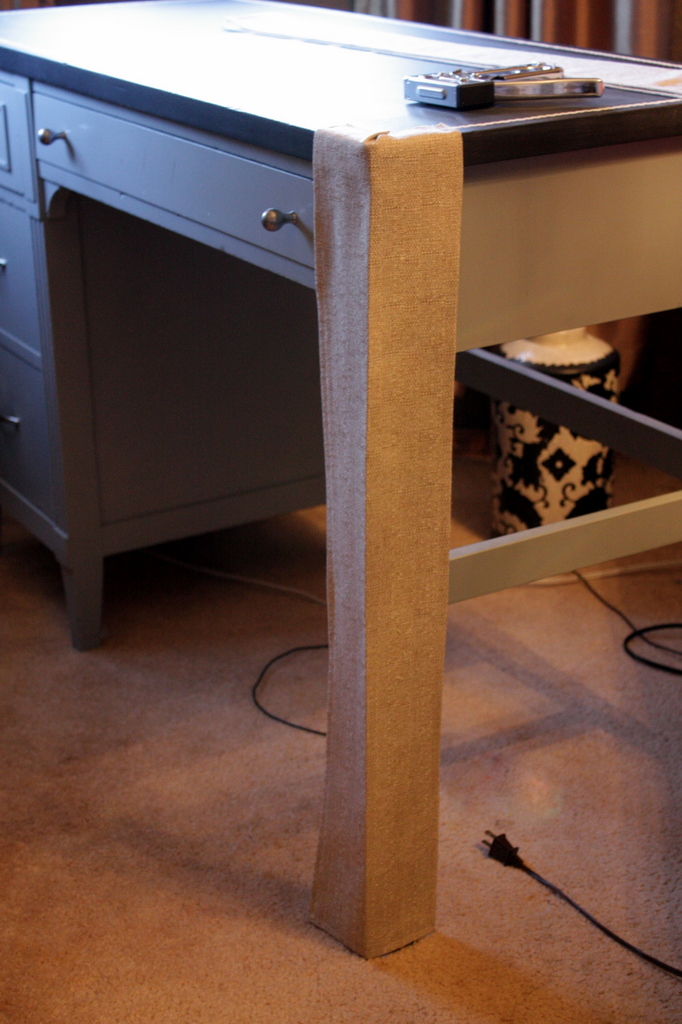
Also, because this is a desk, and I need to access the drawers from time to time.....I had to make it easy to lift the skirt. So my plan was to make two panels for each of the ends and one panel for the top and front.

I also created corner panels so there was something behind the sides of the panels and not just space and/or a desk leg. I measured, cut and sewed a hem around three sides, I didn't bother hemming the top edge (on any panel) since it would be stapled and I didn't want the added bulk. The finished corner panels are about six inches wide. I stapled the top of the panel right on the desktop. I also ironed the panel in half so it would be nice and easy to line up and staple. Do both corners.


Next, attach each end panels, again with staples.


Once both ends are on, the big panel for the top and front goes on. I had about a half inch of extra fabric, which is where I stapled across the back of the desk. You don't even see any of the staples.


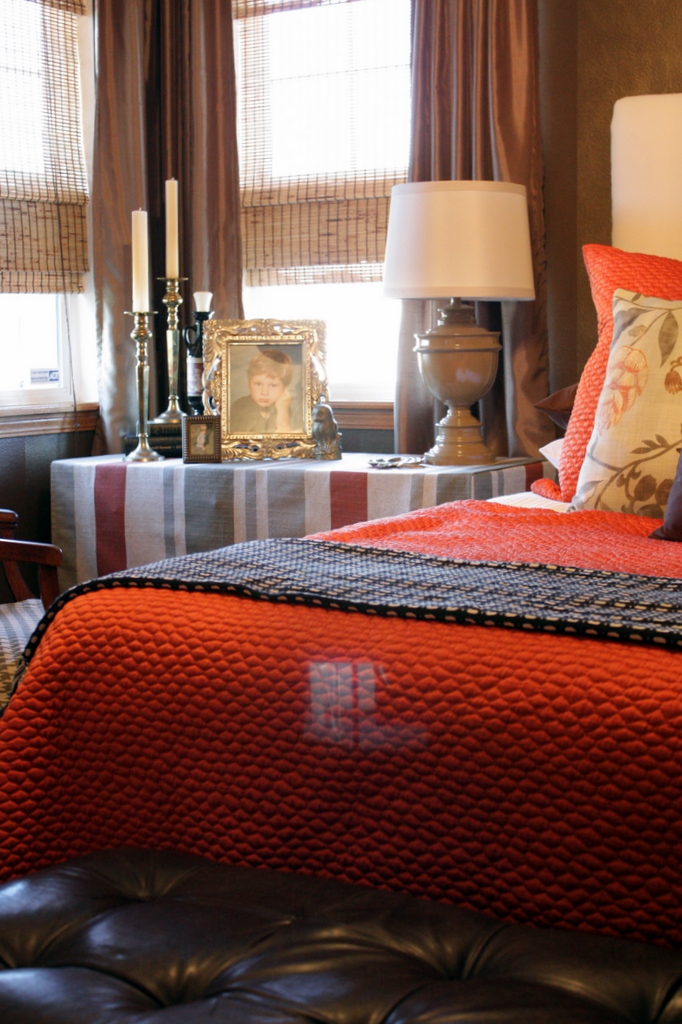
That is it! You've created a custom tailored skirted desk! I put everything back in place and was ready to accessorize (of course!). It is a little strange to me with the lamp on the left, but it really does need to be close to me while I'm in bed.


To balance off the lamp, I used a couple of candle holders, books, frames and a little owl. The black bottle was something of my mom's that I ran across in storage while cleaning it out. I really liked it and decided to keep it. I think it might be a liquor bottle or something, I'm not sure. I liked the Egyptian motif on it and think it's pretty neat.


Remember this little owl I found at Cimarron Flea?


I love how the feminine and fancy frame and things look on the masculine stripes


The room is coming together! I bought the other curtain panel , so finally the windows look decent. Now I have to buy some glass to protect it, I'm not in a huge rush though since it's in the bedroom.


Did you notice I found a different chair? I think it's more fitting for a desk. I love the shape of it and I'm thinking of leaving the wood and just reupholster. I think.


I selected THIS houndstooth and I made a little pillow out of the main fabric already! This will make the third chair I've got to reupholster....I'm scared to death to start them!

(Don't you just love houndstooth!)


Well, I hope you give this a try, I love the look and it was pretty easy. I know some of you that are accomplished seamstresses, can whip this up pretty quick. If you have any questions, just leave them in the comments.


Thanks for stopping by I hope you're inspired! I've started bring out Fall things, have you?


Wednesday, September 7, 2011

A Little Bit O' Fall


Today, I went to the booth to straighten up and add some new things, so I thought I'd bring you along. Are you getting sick of this? I also did a couple of arrangements for fall (because I'm totally ready!). Some of my handpainted signs, you might remember me showing you how to do them HERE. I had the Singer sewing machine open, but decided to close it up and feature the new fall things. I found some old rakes to add some rustic charm. They work great to prop up the signs too.


I took a shot of the green and white dresser so you could see a better 'after'. It's a great piece.
I really like the gold on the green and the stripe makes it really unique.


So here is one of the two arrangements, I love this one . I love using natural things like the birch and the lotus pod ( I really like the look of the lotus).


Some new fun finds, these plaques feature chess pieces. Aren't they fun and a little kitchy!?! I think these would be great in a game room or library.
The second arrangement is a little bigger, more of a centerpiece. I used pine cones this time.

And finally, the Sheet Music Wreath, hanging on the mirror.


Thanks for tagging along! Leave me a comment and tell me what you think!


More Before and Afters, The Power of Paint

I have been neglecting the blog a little, but since the booth is up and running, I hope to get things on track again (hopefully!) I've gotten my skirted desk in the works and continuing in the bedroom so be looking for that soon.

I wanted to share a few more projects that really show the power of paint and I hope it inspires you!

As you all know, I love a good lamp....so while the color on this one is far from my choice, it has a fantastic shape. I liked the gold base, so I masked it all off, including the cord and went to town with spray paint. Clean metal primer strikes again, I started with that first....then on with the paint.

Didn't she turn out fab? I've been cheating on Blue Ocean Breeze (Krylon) with Exotic Sea (Valspar). Shame on me. :) Exotic Sea is one of the great colors in spray paint at Lowe's. If we had been going into Spring, I might have chosen Ocean Breeze....but this deeper, richer (and exotic:) color is great going into Fall. New fluted lamp shade, I usually go for drum shades, but it just didn't work for this lamp.


Next, a couple of the dressers we repainted....sorry the pictures aren't straight shots, I wasn't thinking about proper 'afters'.

This baby dresser was actually Keegan's, I bought it before he was born for his nursery. It's not very big at all. Later, when Keegan was going through his Spiderman phase, I let him chose the paint color...red and black. Lord.


I've already started sanding here:


After, I've turned it back into a baby dresser with a gender neutral green with sweet little painted knobs. Sorry, not a full on pic.
(Lettuce Alone from Olympic.)


This dresser was another one of Mom's, actually really well made and solid wood. A deep top drawer and three standard, really great size too. Someone had done a horrific faux treatment on it. I don't mind faux, but this was a bad job. Also, it didn't match the style of the dresser either....the handles are clearly art deco in style, which just does not go with faux. Bad, bad faux.


Here are the original handles that I kept. They were looking their age, so I freshen them up with rub-n-buff (antique gold). That stuff is awesome.


I painted it glossy white and did a bold stripe in green. Again sorry, I should have moved that tapestry....I love the handles against that green! (Asparagus from Olympic) Now, I think she is showing her true colors!

I couldn't resist adding this picture (or on my new fall banner)! A colorful friend hanging out while painting, luckily he landed on dry paint! Can a grasshopper be pretty? :) He looks great on blue.....


The weather has really wonderful here, it's really got me in the mood for Fall! Can you believe Summer is over?


Friday, September 2, 2011

The Blue Dresser and Wreaths!

Opening day was yesterday at Rangeline Antique Mall! Thank you for all the wonderful comments and support in my new adventure! I wanted to get down there early in the day and hang some wreaths but our AC decided to quit so I had to stick around the house til the AC guy came out. It's not been one of my good days to say the least...I've been hot and frustrated all.day.long. Luckily, around five, I was able to run three new wreaths out to the booth (you'll see them below) and I wanted to start showing you some B&A's of some of the furniture pieces I used.


When I decided to do the booth, I had a pretty good idea what was in storage and this dresser is what I wanted for the focal point. It is the dresser that I had growing up, but it didn't always look like this....it didn't even look as good as the 'before'. I don't remember all the details, we were living in Williamsburg at the time and my parents bought this dresser, mirror and a matching desk for my room. It was second hand and the former owners had stripped the furniture and then I guess decided to bail on the project and sell it. To make a long story short, I lived with the 'stripped' furniture look (not the good kind) my whole childhood. My parents weren't much on DIY. :)


However, Mom finally decided to paint it.....I think I was 32. :) This is the 'before', she painted it a cream color and left the handles original.


It wasn't a bad choice and she did a nice job but I wanted to do a little something different. Now, like I said, I had a plan for the booth....I wanted a black and white trellis pattern wall and a blue dresser to sit in front of it, so that's how I decided on what color to go with. I knew I didn't want the mirror matching, but I didn't decide on the finish for that until later.


I painted the handles with clean metal primer and a couple of coats of glossy white from Krylon. I think they turned out great, they were so dingy before.


The blue is called Schooner Blue from Olympic paint at Lowe's. I had a quart mixed in a gloss enamel and had some left over. This piece ended up being my MIL's baby, she painted the whole thing and didn't even complain (out loud :) about the sanding in between coats I forced her to do! She did a great job!


She gave it a coat of furniture wax and this dresser turned out beautifully! So while I think it will take a special customer to buy it, the booth would have been dull without it. I love how the amber lamps look on that blue!


I also wanted to show you a couple of wreaths I made. I'm trying a new size this year; the finished size on this is about 24". I personally like them a little bigger, but the smaller sizes sell better for me. I didn't use any ribbon on it either, I wanted to see how that will go over too. I hope to get some more made as well.
I have not listed this on Etsy, it is hanging at the booth now. If you think you would like it and need it shipped, just let me know. We can work that out.
( I can't wait for Fall!)


Then I made a eucalyptus wreath, old school I know, but I love eucalyptus and it makes such a beautiful wreath. This one will need a little more TLC than the silk wreaths but I think it's totally worth it and good smelling too! This finished size is 30", again if you're interested, email me.

Now don't smack me. Yes, it's a sheet music wreath. I was shopping around, you know, like I do... and I found an old music book. I just had to make one for my booth. I felt obligated to introduce them to Southwest Missouri! :) For the record this was part of my frustration today.... ninety+ degree heat and making little paper funnels don't mix for me....it took me forever to do this wreath! I hung it on the mirror at the booth....I'll let you know if it sells. I don't think this would be able to ship (it's too delicate, I think), sorry!


Thank you for stopping by, I hope you're inspired!!