
Did that title get your attention!?! :) he he he! Sorry, I just couldn't resist! I haven't really been drinking, but I have {still} been collecting bottle caps and came up with another project just in time for the 4Th of July. If you'd like to see my other bottle cap creation, a bottle cap tray, click HERE.


First of all, determine your number of caps by laying them out on your board, sort of a dry fit, so to speak. Determine which will be painted blue, red and white, and separate them, I just eyeballed it. Spray prime them and let them dry, I used cardboard to paint them on and labeled each one the appropriate color so I wouldn't get mixed up...
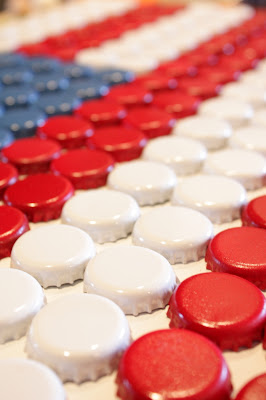
After the primer has dried, spray on the 3 colors. I used Krylon paints because it dries really fast and you can quickly do 2 or 3 coats. However, I didn't do this all in one day, I let the primer dry over night, and then the final coat of paint over night. I also painted the board white. Now the gluing begins, make sure you have plenty of glue sticks handy, two squeezes of the trigger gets just the right amount of glue per cap.
until you've
I wanted to use ribbon as the hanger so I measured in about four inches and used an eye screw on each side of the top to tie the ribbon on.

Attach the ribbon of your choice, I had this flag ribbon on hand, but I saw some cute ribbon at Michael's when I was buying the wired star garland. I made a bow with the star garland and attached it around the eye screw and then tied a small bow with the flag ribbon and wired it on too, leaving some nice long tails.

I used some silver letter stickers and put USA on the lower right hand corner, just in case it wasn't patriotic enough. :)

It is ready to hang on the front door! It looks really festive when you're walking up the walk.

Ok, in retrospect, I think I would rather have the "stripes" in single rows.... a single row of red and white vs. double like I have it. It wasn't until I hung it up did I notice that it would have looked better that way, sometimes I forget to step back from a project. I might change it, but then again, I might be being a little too anal.
Secondly, I should have painted the board black and then the caps would have seemed to be floating, which would have been way cooler, oh well.

All in all, I love how it turned out and it is totally original.

I hope you are inspired to keep collecting bottle caps and put them to use! Thanks for stopping by!


I love this project! I can imagine that glueing all of those caps in place was tedius, but the end result is well worth it.
ReplyDeleteLove it! Take a look at our Collection of Miller High Life caps. Thanks for sharing! MJ
ReplyDeletehttp://mjporacky.blogspot.com/2011/06/bras-across-broad-ripple-miller-high.html
hot dog...i love it! i have just put a friend to work getting me bottle caps!! this is going to be hanging at my front door for sure! i love all your awesome ideas, by the by, i found a coke crate and will be doing the flower arrangement too! i cant wait - it is so pretty. thanks for all the inspiration! Donna
ReplyDeleteThis is seriously adorable! I bet spray painting all those caps was a ton of fun:) I don't think I would ever be able to collect that many bottlecaps though...I wonder if you can get them at the craft store?!?
ReplyDeleteThanks for your comment! I am now a proud follower of yours!
ReplyDeleteSee you soon,
Liz
What a fun idea! Thanks for sharing not only the idea, but what you might have done differently....it gives us more think about when we go to make it. Although, I think it looks great as it is!
ReplyDeleteWow! I really like your flag made from all thoes caps. Very creative! Also I really like your flag made out of palet wood. I made one like it last year but mine is smaller. I keep it up on my shed most of the year. Thanks for sharing.
ReplyDeleteMe likey a lot! You have way more patience than I. Great job!
ReplyDeleteexcellent project. spotted you at tater tots. some day i've got to try this. thanks for the tutorial.
ReplyDeleteOMG! I LOVE this!! How cute!
ReplyDeletehttp://btanders.blogspot.com
So cute idea! i love it very much. i linked up to my blog: http://make-handmade.com/2012/01/03/recycling-ideas-kids-bottlecap-flag-flag-day/
ReplyDeleteThanks for sharing.
I have gathered all my materials and am ready to start my flag. Luckily I have a friend who works at our local VFW and saved up the bottle caps for me. :) Love this idea for american flag. Will let you know how it turns out! Thanks for the tut.
ReplyDeleteThis is awesome Michelle! Thanks so much for sharing that giving us such a super tutorial!! Happy New Year to you!
ReplyDeleteCharlotte from AZ